In the contact centre ScreenPhone is used in conjunction with the rostrvm Web AdVisor client application. However, it can also be used directly to make and receive telephone calls and to manipulate those calls. The following sections describe:
| • | how an incoming call is answered; |
| • | how to make an outgoing call; |
| • | holding a call; |
| • | transferring a call; |
| • | conferencing and silent monitor; |
| • | call display options. |
When incoming calls are received, a small call control window is displayed:
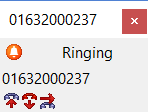
In addition an incoming tone is played to the agent. The incoming tone is configured by the presence of an ScreenPhoneIncoming announcement in the Invex Announcements (which can be recorded and saved using the Invex Announcement tool available from Manager). If this does not exist a bell sound is used.
The window will be positioned in a corner of the screen as configured. The window allows you to see who is calling, and provides buttons for handling the call.
From left to right, the button functions are:
| • | answer the call; |
| • | return busy to the caller - if voice mail is configured the call will be handled by voice mail; |
| • | re-queue the call to another user. When this action is selected you will be presented with a dial menu of numbers to send the call to, or an Other... option which allows an arbitrary destination to be entered. |
If you elect to speak to the caller, the state of the call will become connected as follows:
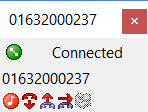
The call handling buttons in this case (from left to right) are:
| • | place the caller on hold; |
| • | hang up; |
| • | make a consultation call; |
| • | re-queue the caller; |
| • | record the call - assuming call recording is configured (in the example above it is not hence it is greyed out). |
DTMF digits
DTMF digits can be entered from the keyboard when the mouse is over the call control window.
Calls may be made by either selecting a phone book entry, or by entering a phone number or SIP address into the Dial window:
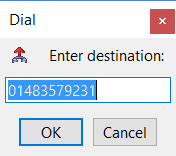
The Dial window is opened by either selecting the Make Call option from the main menu, or by left clicking the ScreenPhone icon in the system tray.
When the call is made, a call control window will be displayed in a similar manner to incoming call control windows.
Any connected call may be held by simply pressing the hold (first) button on the call control window. A call that is in the held state will appear:
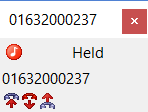
The call is retrieved by selecting the connect (first) button. While a call is on hold, the remote party will hear music (if so configured).
When more that one call is being handled, only one may be connected (i.e. have a voice path), all the other calls will be held. If an incoming call is answered any currently connected call will be held.
In order to transfer a call, you must first make the consultation call to the destination of the transfer. This is done by clicking on the consultation call (third) button on the call control window. This will display the dialling menu to allow you to select from a phone book, or to use the Other... option to enter an arbitrary destination.
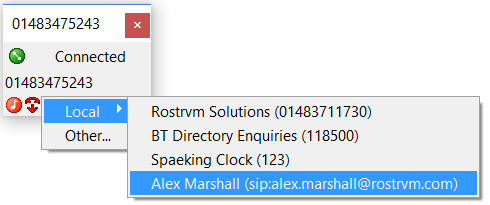
When the call is placed to the destination, the original call is automatically put on hold. Once the call has been established with the destination of the transfer, a transfer button will appear on the call control window for the original call. To transfer the original call to the destination (that is currently connected) press the transfer button.
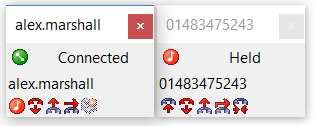
The transfer button can be seen in the call control windows shown on the left; it is the right most button. The transfer can be cancelled by hanging up the destination call and retrieving the held original call.
Silent Monitor and Conferencing
Silent monitoring (and Conferencing) is only available in rostrvm mode, and may only be used to monitor other rostrvm Invex users.
A ScreenPhone user may only monitor other Invex users if the ScreenPhone Silent Monitor permission is enabled through Manager. Selecting to monitor an agent causes ScreenPhone to prompt for a username and password (unless it has done so already for a previous monitor).
To start silent monitoring, the user selects the connected destination from the system tray Rostrvm Users sub menu (this has further sub-menus for the user groups, and then displays individual users under these groups). The users shown on the menu have an icon indicating the state of the device, the silent monitoring functions are available when a connected icon is selected.
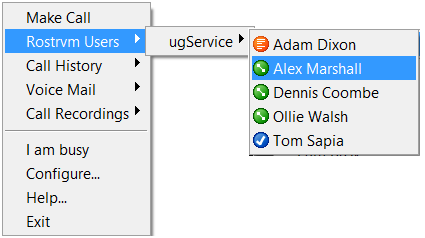
This example shows user Alex Marshall has a connected call and it may be possible to monitor that call.
Selecting the connected call will display the Join Call dialog box:
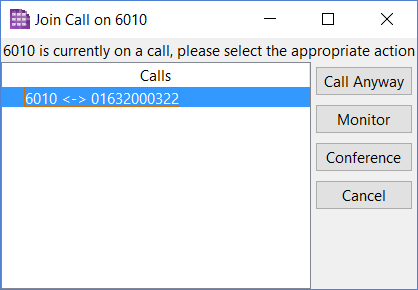
Once the call is selected, the following operations can be performed:
| • | Call Anyway - Place a normal (separate) call to the agent. The agent will see this as a second incoming call and has the option of answering it or not. |
| • | Monitor - Silently monitor the call (subject to user/password authorisation if required). |
| • | Conference - Conference into the call such that the agent can see the conference, and the conferencing user has a voice path into the call. |
| • | Cancel - Close the dialog. |
While monitoring an agent, the agent and the party connected to the agent will have no indication that the monitor is in progress.
The call control window for the monitoring call includes a conference button to allow intrude. This will set up a conference with the agent, the remote party and the monitoring ScreenPhone.
The handling of calls can be modified by selecting the Configure... option from the main menu and selecting the Calls tab.
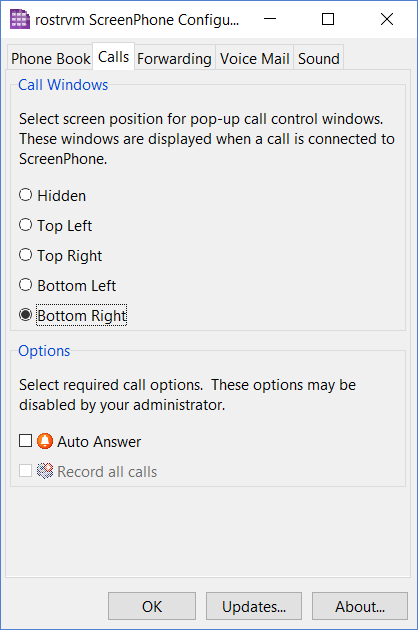
The configuration options available on this dialog will depend on those provided by your system administrator but may contain the following items:
| • | Position for the call control windows (top left, top right, bottom left or bottom right). |
| • | Auto answer if specified means that incoming calls will be answered immediately. Calls will only be automatically answered when there are no other calls being handled. |
| • | If the Record all calls option is selected then all calls will be recorded, if it is not then a record button will be available on call control windows to allow the call to be recorded. This option is only available should the Contact Recording Control option is set to Agent Controlled on the AuditLog Properties page. |