Title Bar
When rostrvm Manager is invoked from your web browser and you have successfully logged on, the Home page is displayed. This consists of the Title Bar and an initial MIS report in the main display area. From the title bar a number of functions are available:

admin is the user name used to logon and so may be different on your system. The following functions are provided:
| • | rostrvm logo (Home) - takes you back to the Home page. This also resets all display parameters and resets the reporting date to Today. |
| • | Administration and Display menus - the menus are grouped into the type of function to which the subsequent options relate. New menus are added if custom reports are created with a new menu name. The options available from each menu provide access to other MIS reports and displays or access to administration functions and operations. |
| • | Customer name - the name of the customer as provided on rostrvm installation. |
| • | System Notifications - view any system notifications - a red indicator with the number of outstanding notifications is added to the icon if any new notifications have been generated and have not yet been viewed. |
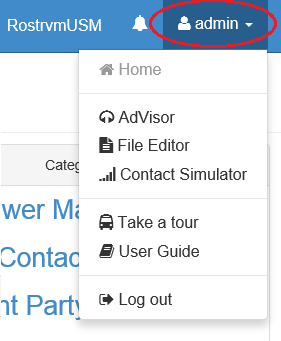
| • | Logged on User - your current user name is shown here. Clicking the button reveals a menu of other rostrvm applications that can be launched. It also allows you to log out of Manager. |
The logged on user drop-down menu is accessed by clicking on the user button (i.e. the name on the button reflects the rostrvm user that was used to logon to Manager - admin in this case):

The following functions are provided (note these may vary depending on your user permissions):
| • | Home - return to the default Home report; |
| • | AdVisor - launch the rostrvm AdVisor agent client application; |
| • | File Editor - launch rostrvm File Editor (to edit database files); |
| • | Contact Simulator - launch the contact simulator (primarily used for application development and system load testing); |
| • | Take a tour - provides a short tour of rostrvm Manager; |
| • | User Guide - directs the user to this online manual; |
| • | Log out - log out of rostrvm Manager. |
Administration and MIS Display Common Functions
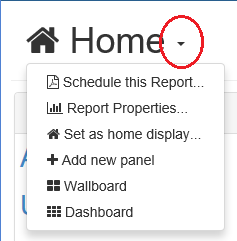
The Administration and Display menus provide access to a number of reports and displays that allow you to configure the rostrvm system and to view in real-time or historic management information (MIS) pertaining to agent and system performance. The precise options on each menu is dependent on your user permissions. Many of these screens have a common set of functions which are accessed from the drop-down menu that is expanded by clicking the icon to the right of the display name:

This example shows the drop-down menu being invoked from the Home display but the options are the same for many of the other reports and displays.
Note: Some of the pre-defined report properties can be viewed but cannot be changed. These view only fields are shown with a shaded background.
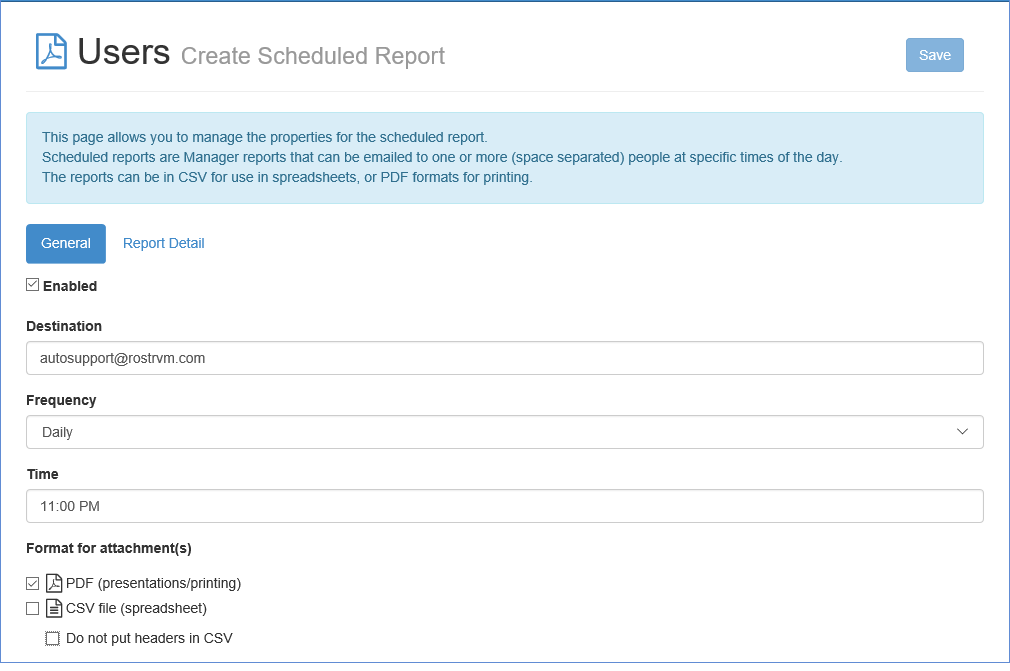
This option displays the Create Scheduled Report page, which allows you to manage the properties for the scheduling of this report.

See the Scheduled Report Properties page for details.
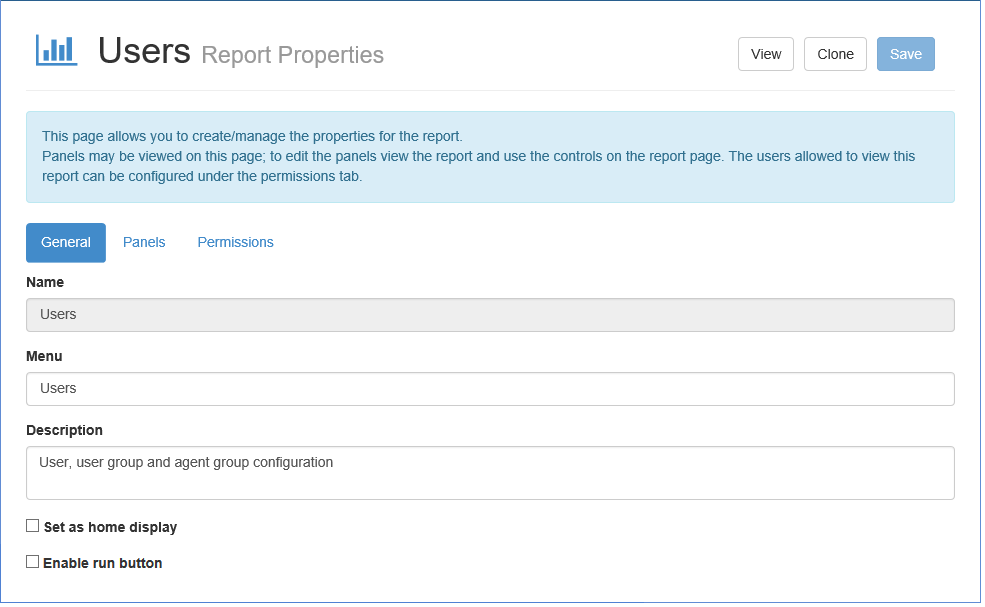
This option displays the Report Properties page, which allows you to create and manage the properties for the report.

From here you can set parameters and perform operations as follows:
General Tab
| • | Name - the name of this report; |
| • | Menu - the Title bar Administration and Display menu under which this report should be placed; |
| • | Description - a description of the report; |
| • | Set as home display - an option to set this report as your home display; |
| • | Enable run button - if ticked this report will display a Run report button which when clicked will run the report. Normally the report is run on selection and when any of the parameters are changed which can take a significant amount of time. Using this option allows the setting of multiple parameters (without waiting between the setting of each one) prior to the report being executed. |
Panels Tab
| • | From here you can view the current panels that form this report or display. Clicking the Title of the panel takes you to the report editor from where you can change the contents and look of the panel. This is described in detail under the Custom Displays section. |
| • | Restore Layout - for pre-defined reports only, clicking this button restores the panel content and layout to the original out-of-the-box settings. |
Permissions Tab
| • | From here you can set which users and user groups can view this report. This is described in detail under the Permissions and Roles section. |
Operations
| • | View - allows you to view this report in Manager (normally used whilst creating a custom report or display); |
| • | Clone - allows you to create a new custom report based on this report; |
| • | Save - once you have entered the desired contents click the Save button to apply the changes. |
Set as home display
Selecting this option from the drop-down menu will set the report you are currently viewing as your home display. This means if you click the rostrvm logo you will be returned to this report rather than the default home display.
Add new panel
This option is used when creating your own custom display or report and is described in detail under the Custom Displays section.
Wallboard
This option is used to change the current display into wallboard mode, whereby the report is shown in a format suitable for large displays.
Dashboard
This option is used to change the current display into dashboard mode. This is the similar to the wallboard layout except that some of the spaces and padding are removed.