This section shows how you can use Web AdVisor's functions to handle calls. Overviews and steps are provided to take you through each of the following call handling activities, in turn:
Each set of steps is based on a user operating their phone through the Web AdVisor application.
If you are using CallGuide scripts then some of the functions available from the Tool bar may be restricted (greyed out) or provided as an alternative method through CallGuide scripting.
Function buttons may also be unavailable (greyed out) if the rostrvm server is unable to support these services at this time (e.g. a ScreenPhone controlled agent with ScreenPhone not running).
Agents generally receive ACD or dialler calls only when they are in the Ready state. Calls may arrive from an external source (from a queue or as a direct dialled call) or from another agent's workstation. Call information is displayed in the Tool bar.
Where a call is external, the CLI (calling line identifier) is shown; where a call is internal, the agent name or device name appear. Incoming calls may arrive by either of the following routes:
| • | Direct Calls: You may receive calls directly from other agents, or from external callers. These may be passed straight to you, or queued until you are in the Ready state. |
| • | Transfer: Generally, an agent will discuss a call with you before transferring it to your workstation. However, they may choose to use the blind transfer option, where the call is transferred without consultation, and the switch re-queues the call, whether you are busy, wrapping-up, ready or not ready. The switch may then queue the call if necessary and pass it to you at the first opportunity. |
When an incoming call arrives at your workstation and a call slot is available, the slot is displayed, together with the CLI information (this is the alerting state).
To answer a call in the alerting state:
Click the alerting call slot icon.

The caller is connected.
Auto Answer
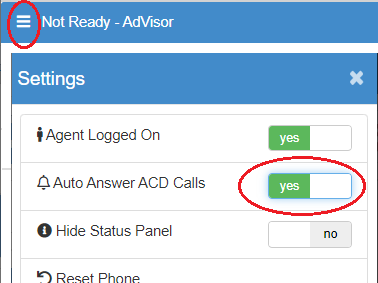
It is possible to configure AdVisor to auto-answer incoming ACD calls. This is only possible if the global settings in Manager Telephony Properties is set to Allow Agent to Set, otherwise this option is greyed out in AdVisor.
To set auto-answer ACD calls, from the Settings drop-down menu click the Auto Answer ACD Calls option:
The Clear Call button enables you to hang up the active call.

Where the active call is a conference, select this button to hang-up yourself (other members may continue with the call).
The active call is cleared. If you have no other calls, your agent state changes to Wrap Up until you change state, the wrap up time expires, or an internal call is received.
The wrap-up time out is set by your system administrator, at user, user group or switch level, through rostrvm Manager.
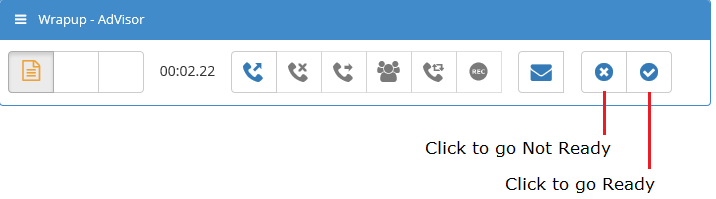
When you clear a call, the AdVisor window normally indicates the Wrap Up state (note the Wrap Up state may have been disabled through rostrvm Manager, or rostrvm does not support wrap-up for the type of call).
This state provides you with a period between calls in which you can complete any actions arising from the cleared call (normally achieved through specific CallGuide scripting).
When you have completed the wrap up stage, select the Not Ready button to prevent further external calls from arriving at your workstation, or the Ready button to accept another external call.
Not Ready reason codes
If Not Ready Reason codes have been configured, when the agent goes Not Ready a list of configured User Status codes is displayed. Click the Select button to choose one to signify the reason why you have entered the Not Ready state.
Note that normally when an agent enters the Not Ready state then the Not Ready button is greyed out. However, if Not Ready Reason Codes are defined then it remains selectable so that a new reason code may be entered.
To make an outgoing call click the Make Call button (this is normally done from the Not Ready state).

The Select Destination dialog box appears.
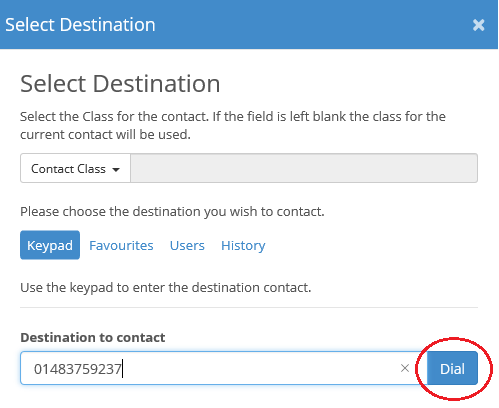
Either select a destination from the Favourites, Users, or History tabs, or type in the manual destination of the call you wish to make from the Keypad tab and click Dial. Before doing so a specific call class may be specified using the Contact Class drop down menu.
Note: If the agent is making a manual call whilst logged on to an outbound campaign, any configured prefix associated with the campaign will be added at the start of the destination telephone number.
To place the current call on hold click the connected active call slot.

The call is placed on hold.
Being placed on hold
It is possible that another agent to whom you are connected may put you on hold. The active call slot then shows the held icon just as it does when you place the call on hold.

You cannot retrieve a call if another agent has been placed you on hold. This can be done only by the agent who has placed you on hold.
This facility is available only when you have placed a call on hold. To retrieve a call which has been placed on hold click the call slot where your call is held.
The call is re-connected, and you may continue with your conversation.
This facility is available only when you have agent controlled call recording enabled on the switch properties and the call is in the connected state. To record a connected call click the call record icon.

The icon will turn green and the call is recorded from that point on.
While handling a call you may need to obtain information or advice from another agent. Your Web AdVisor interface enables you to make a secondary call to another agent position or external party while holding the current call. This is known as a consultation call. Once complete, the consultation call can be cleared and the held call re-connected. A consultation call can be made by initiated either a Transfer or Conference call. If the call is not to be conferenced or transferred then either button may be used to consult with another agent.
You must have an available call slot to launch a consultation call.
To make a consultation call click the Initiate Transfer button.

The Select Destination dialog box appears. Select the call destination, or enter the number directly from your keyboard and click the Dial button.
AdVisor contacts the selected party and places the call on slot 1 on hold. When the remote agent answers the call, your call is connected.

If you have called another agent who is currently in the Busy state, the call with either be queued or fail rather than connected as shown here.
Once a consultation call is established, the original call is put on hold. You may sometimes need to switch back and forth between a held and a connected (consultation) call without disconnecting either. AdVisor supports an alternating feature to enable you to do this.
To alternate from one call to another click the held call slot icon you wish to activate. The held call becomes active and the other call is placed on hold.
You can alternate as many times as required whilst engaged in a consultation call.
There will be occasions when a customer requires more than one service or requires another agent to handle their call. AdVisor offers a transfer facility to support these situations. You must have a free call slot in order to transfer a call.
A call is transferred by first making a consultation call by initiating a transfer (note that you may be able to complete a transfer before your specified destination answers. This is known as a 'blind transfer'). To complete the transfer click the Transfer Call button.

This will complete the transfer by linking the two parties and disconnecting yourself from the call.
The slots occupied with the calls you have linked are cleared, leaving you in the Wrap-Up state (agents only). This enables you to complete any post-call activities before making or receiving any further calls.
A conference call is a call shared between more than two parties. The conference call is created by first initiating a consultation (for conference), then adding the consultation call to the previous call. This process can be repeated to add further parties to the call. A participant may exit the conference at anytime.
This option is available for an active call slot only if a free call slot exists. The maximum number of parties within a conference depends on the telephone switch that you are using, but is normally limited to 3 parties.
To set up a conference call click the Initiate Conference button.

The Select Destination dialog box appears. Select the destination of the call you wish to make and click Dial. When the conference call is answered, the consultation becomes active. Click the Conference Call button to complete the conference.

The second call slot call disappears and the conference icon is displayed in call slot 1.

The icon shows the conference regardless of how many other parties are added to the call. It remains until you clear the conference call, or until the other parties disconnect.
There may be occasions where you want to pass a call to another agent without speaking to them first, such as to pass a call to a queue. Web Advisor's re-queue facility enables you to transfer a call without first setting up a consultation call.
To re-queue a call, with a primary call established (or alerting) click the Requeue Call button.

The Select Destination dialog box appears. Select the destination to which the call is to be requeued and click Dial. The call is immediately transferred to the selected destination.
WebRTC Volume Control and Inputting DTMF
WebAdVisor may run as a WebRTC client as well as the normal Telephony SIP client, thus affecting how voice is transmitted to and from the agent. The mode in which it operates is configurable from the User properties (by setting the Station field to Use Web Browser for WebRTC).
As a WebRTC client, there may be occasions where you need to change the volume of your call, or input DTMF in response to an IVR prompt. The former is achieved using the volume control function on the top right and the latter through the Dial Pad.

To change the volume of the call click the Volume Control icon and adjust the sliding volume bar accordingly.
To display the Dial Pad, click the Dial Pad button on the toolbar. The Dial Pad popup window is displayed.
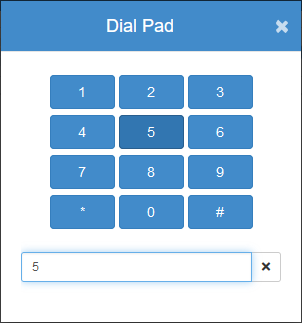
This allows DTMF digits to be entered, either by clicking the buttons on the pad or typing the digits directly into the text box.
The Dial Pad is only available when the AdVisor is using WebRTC for transmitting and receiving voice.
There are occasions when the AdVisor application and rostrvm get out-of-sync with the telephone switch (e.g. a call is cleared on the switch but no message is received by rostrvm to indicate this). When this happens it is possible to re-synchronize with the server and the switch by clearing the effectively stuck call using the Reset Phone or Re-sync Device options from AdVisor. Both options are available from the Settings drop-down menu.
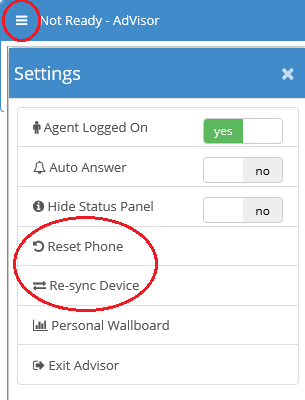
Reset Phone
This option effectively clears out any phantom calls from the AdVisor. It re-syncs rostrvm with the telephony switch.
Re-sync Device
This option effectively re-populates the AdVisor displays with any missing calls. It re-syncs the AdVisor with the rostrvm server and telephony switch.
It is possible to handle multiple contacts (telephone calls, emails, chats) at the same time if configured to do so (through Manager using the Contact Handling Tab from either of the telephony, agent group, or user properties pages). Each contact is shown as a separate entry in the My Task List frame to the left of the display.
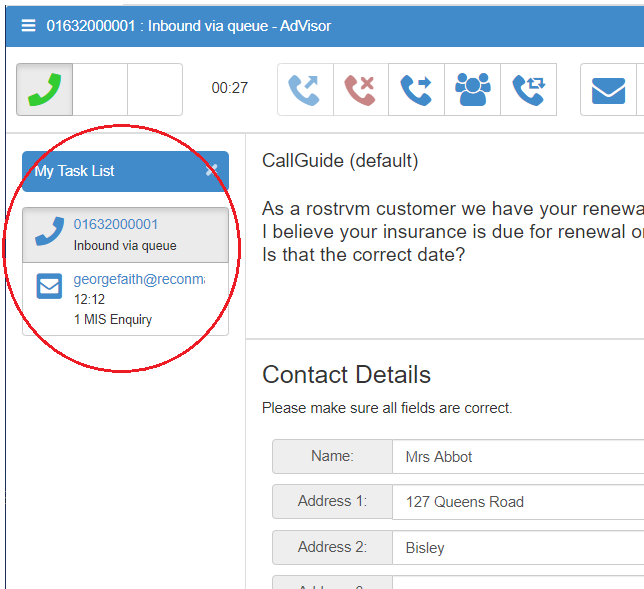
The My Task List frame can be hidden by clicking the hide window x, and unhidden by clicking the show window button. An entry is displayed for each contact that has been delivered to the agent by the rostrvm server. A single telephony contact is always shown at the top of the list, regardless of whether the agent is handling a call or not.
All new email, chat and instant message contacts are displayed with bold text and a flashing background when first received. The flashing background and bold text effect are removed once the contact has been selected/answered. To swap between each contact simply click on the entry from the My Task List panel.
Each contact has a unique icon that identifies its type (i.e. Telephony, Email, Chat or Instant Message). This can be overridden by associating a new media icon with the call class of the contact using Manager.