<Users Report How to navigate to this page> Typical display>
Manage the properties of an individual user entry. Users can only edit the properties of a user whose role does not outrank their own.
General Tab
General information about the user.
| • | User Name - the name of the user (User Id); |
| • | Full Name - the user's full name; |
| • | Station - the station associated with this user (if not using computer names); |
| • | User Group - the user group to which the user belongs. To assign the user to a different user group, select the required group from the drop-down list or to create a new user group enter a new name. |
| • | Select a Role - the role assigned to this user; |
| • | Telephony Control - allows a user to be classed as a Normal or Non-Controlling user. Non-Controlling users are intended for cases where a device is to be controlled by more than one user. In this case there can only be one normal user controlling the device. Actions performed by Non-Controlling users on the device or call are recorded as if performed by the normal user. If there is no normal user controlling the device, the User Id is left blank in any MIS recorded. |
Agent Details Tab
The agent details for the user if they are to perform agent functions.
| • | Agent Id and Agent Password - the Agent ID and optional password to be used to logon to the switch. rostrvm users who do not want to handle telephone calls or emails (e.g. supervisors) can leave the Agent Id blank. If the Agent Id is filled at least one Agent Group must be configured. |
| • | Initial Agent State - the initial state that the agent is placed into following an ACD logon (this is not applicable to devices that are configured as 'Agent Phone - Constant' on the Station Properties Invex tab); |
| • | Email Address - the email address for this user (optional). |
Agent Groups Tab
The agent groups to which this agent / user belongs.
| • | Group - the agent groups to which the agent can belong. Before an agent group can be associated with a device it needs to be created as a rostrvm device. Once this has been done click the Assign Agent Groups button to bring up the list of configured agent groups, which are then selectable through tick boxes. To create a new agent group click the Create button. |
| • | Assigned Campaign - if the group is associated with an Outbound campaign then this column shows the name of the campaign. |
| • | Assigned Queues - if the group is associated with any Inbound queues then this column lists them. |
| • | Logon - if the agent can logon to multiple groups then this tick box determines to which one the agent is initially logged on. Only one group can be selected as the initial logon group. |
Skills Tab
If skill based routing or dialling is to be performed the skills associated with this user.
| • | Skill - Skills are applicable in a rostrvm skill based routing ACD environment. To configure and change the skills that are allocated click the Assign Skills button to bring up to bring up the list of configured skills, which are then selectable through tick boxes. To create a new skill click the Create button. |
| • | Level - set the skill level for this user. Note that a skill level of None effectively removes this skill from the user hence overriding the user group setting. |
Contact Handling Tab
Details of how this user should handle the various contact types.
| • | Wrap Up Timeout - this specifies the time an agent will spend in wrap up at the end of a call to be specified. The timeout type can be: Infinite, 1, 2, 3, 4 or 5 minutes or you can specify a number of seconds; |
| • | Auto Answer ACD Calls / Auto Answer Non ACD Calls - this specifies if rostrvm will provide auto-answer for calls received at the switch. It can be configured to either As for Agent Group properties, No, Immediate, Allow Agent to Set (ACD only), or a specified number of seconds (where 0 is the same as immediate). The auto answer can be set differently for ACD delivered calls and non-ACD delivered calls. However, be aware that a direct consultation call and transfer (particularly from a line whilst the call is queued) is treated as a non-ACD call rather than an ACD call; |
| • | Busy / Not Ready / Wrap Up Routes - this specifies an alternative route if a direct call is made to agent in any of these states. Note that this does not apply to ACD calls, these are only presented to Ready agents; |
| • | Maximum Voice / Email / Chat Contacts - sets the number of voice, email and chat contacts that can be handled simultaneously. For voice this is either 0 (can't handle voice contacts) or 1 (the default). For email and chats this can be any number (although a sensible limit is advised); |
| • | Voice / Email / Chat Contact Rules - determines whether each type of contact can interrupt any, one or all of the other types of contact. It is normal to allow emails to interrupt voice and chat, and to allow voice and chat to interrupt emails only. It is not recommended to allow voice calls to interrupt chats and vice versa. |
| • | Agent Idle Timeout - the number of seconds that an agent can remain in the Ready state until an agent Idle event is generated over the HTTP Restful API event stream (see USM/002 rostrvm InterFace Reference Guide for details). |
Each of the fields on this page has an As for Agent Group Properties option (this is the default setting). This means that the user settings will be taken from whatever is configured for the agent group to which this user belongs (i.e. Contact Handling tab under Agent Group properties).
Security Tab
Security details for this user.
| • | Password - if a password is set in the Password field then this should be used when the user subsequently logs on. Note that the password is not displayed as it is entered, instead a series of ‘*’ characters is shown. If no password is set then the agent has open access; |
| • | Failure Limit - specifies how many logon attempts the user is allowed to make before they are marked as barred in the database and are no longer able to log on to rostrvm; |
| • | Expiry Date - enables the expiry date for the password to be specified; |
| • | Barred - if this box is checked then the user is not allowed to log on to rostrvm. This can be checked manually, but it is also checked automatically when the Failure Limit (see above) is exceeded. Simply uncheck this box to allow access; |
| • | Failure Count - indicates how many times the user has failed to log on to rostrvm. This can be reset to 0. |
Permissions Tab
Allows the setting of the permissions for which this user is allowed to view in the MIS reports.
| • | Queue - select the call classes / campaign that the users in this user group are allowed to view; |
| • | Call Class - select the queues that the users in this user group are allowed to view; |
| • | Manager Display - select the MIS displays that the users in this user group are allowed to view; |
| • | User Group - select the user groups that the users in this user group are allowed to view; |
| • | Copy from another group - allows the permission for this user to be copied from another user or user group. |
Use the arrow keys to move an item between Available and Selected. For each option a tick box allows All items to be selected.
Callbacks Tab
Shows a list of callbacks that are currently pending for this user.
| • | Campaign Name - the name of the campaign against which this callback is scheduled; |
| • | Account Reference - the reference of the account to be called back; |
| • | Skill Required - the skill required to deal with this account; |
| • | Callback Time - the scheduled callback time; |
| • | Latest Time - the latest time in the day that the callback will be made; |
| • | User Name - the full name of the user to which this callback is assigned. |
These callbacks can be reassigned by changing the callback time, latest callback time, and/or selecting a new user to handle the callback from the drop-down menu. Click the Save button to apply the changes.
Operations
From here you can:
| • | Save - click the Save button to apply the changes. If this is a new entry it will appear on the Users report; |
| • | Delete - click the Delete button to remove the entry; |
| • | Set Photo - click this button to launch a file browser so that a photograph for this user can be found and set; |
| • | Delete Photo - if a photo has been set, then it can be deleted by selecting Delete Photo option from the drop-down menu on the Set Photo button; |
| • | AdVisor Profile (User) - click this button to launch the AdVisor Profile configuration utility for this user. |
Adding Multiple Users
To add multiple users from the New User screen select the Create multiple users tick box to display the Name(s) input dialog:
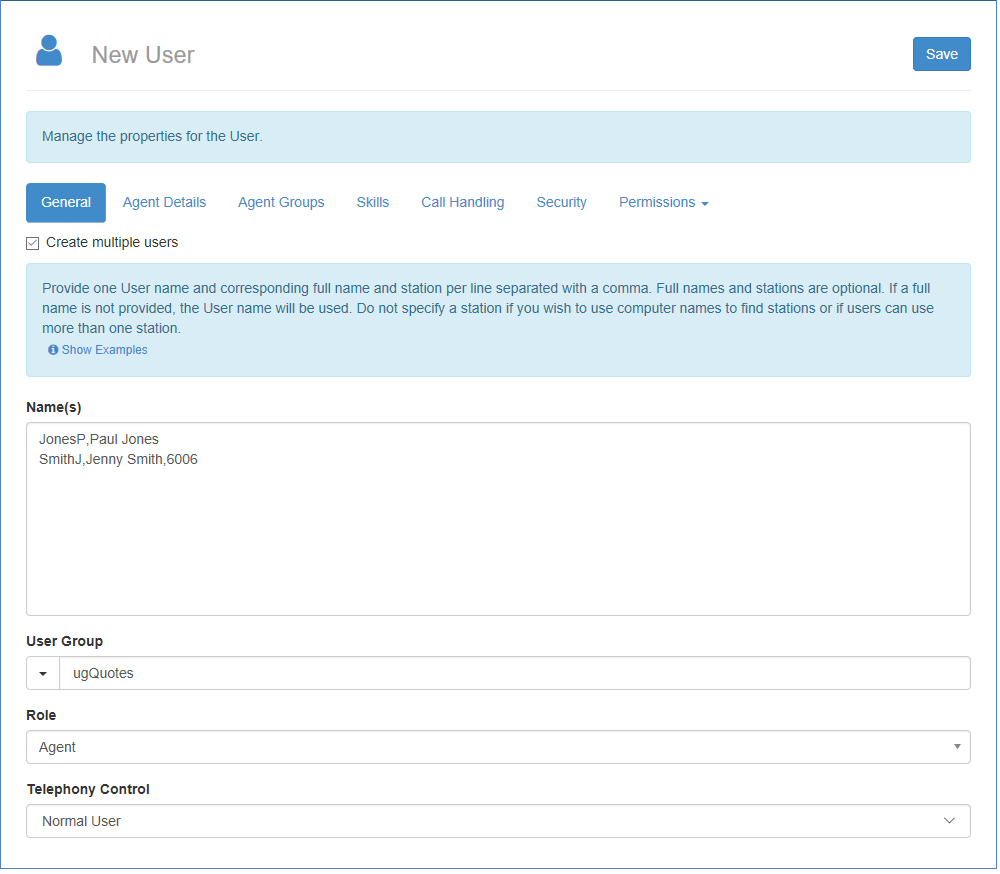
From here you can now enter a list of users and their full name (the latter is optional and defaults to the same as the user name) and a station separated with a comma. All other fields on this tab and the other tabs will be applied to each of the users in this list.