When Web AdVisor is logged onto a rostrvm OutBound campaign, additional functions are made available to the agent.
The following sections describe:
| • | what outbound related functions are available - skip preview, pause, dial now, extend preview, do not call; |
| • | how callbacks are handled, particularly set, viewed, and removed; |
| • | using the callback Diary. |
When the agent is a rostrvm OutBound agent then a number of extra buttons are made available on the Web AdVisor toolbar.
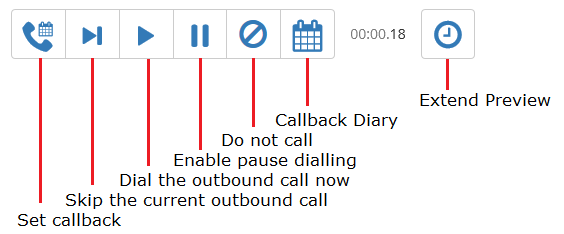
These buttons allow extra actions to be taken by the agent when handling outbound calls as identified above.
Skip the current outbound call
When reviewing account information in the preview period before a call is dialled, you may select to skip the account. This means that you will skip the currently previewed account and move to the Ready state.
As a part of the Campaign configuration, a call that has been cancelled in this way may be rescheduled to be called at a later time, or may be terminated with the appropriate reason code.
To skip an Account whilst in Preview mode selecting the Skip call button from the toolbar. Web AdVisor skips the displayed account and places the agent into the Ready state.
If Skip reasons have been defined (by assigning a business outcome to the predefined category Call Skipped) and set-up in the profile for the current call class, a dialog will be presented requiring the selection of a reason for the account to be skipped.
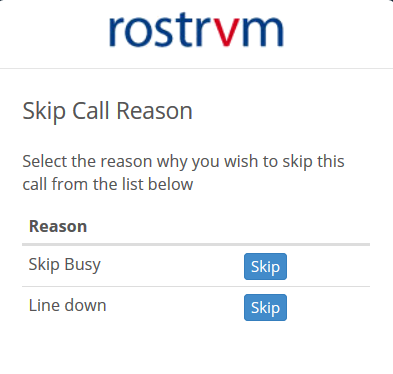
Select a reason and press Skip, this sets the agent into the Ready state.
Pause Preview dialling
When reviewing account information in the preview period before a call is dialled, the agent may select to pause preview dialling. This means that the agent will abort the currently previewed account and move to the Not Ready state. The call that was being previewed is cancelled and is marked as such in rostrvm's Management Information System. It will be re-dialled based on the redial rules some time later.
To pause dialling whilst in Preview mode select the Pause dialling button. Web AdVisor aborts the displayed account and places the agent into the Not Ready state.
Dialling a Call without waiting the Preview time
When dialling in Preview mode, account information will be displayed and the call will be automatically dialled after a pre-configured time. In many cases, you will not need to wait the full preview period and you may select to 'dial now' which will start the dial process without waiting the remainder of the preview time.
Selecting the Dial now button will cause the account to be dialled by rostrvm without further delay.
Extend Preview time
When dialling in Preview mode, you can select to extend the preview time by selecting the Extend Preview button. Depending on the profile settings, this will extend the preview time by a certain length or, if the Agent Control option has been selected, for an infinite period.
Do not call an Account
In some cases, when talking to a Customer, the Customer may indicate that they are not interested in further calls. You may select the Do not call option which will mark that account as one that cannot be dialled.
This button can be configured for outbound and inbound calls as well. The configuration also determines whether the Do Not Call request applies to the current list, the current campaign or all activities.
To mark an Account or number as do not call select the Do not call button. Web AdVisor will, after completing the confirmation dialogue, mark the account as one that should not be dialled by rostrvm.
If Do Not Call (DNC) reasons have been defined and set-up in the profile for the current call class, a dialog will be presented requiring the selection of a reason for the DNC to be set.
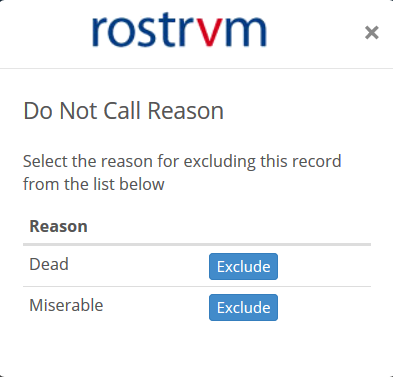
Select a reason and press Exclude.
Note: Selecting an account for do not call has no effect on an immediate callback (i.e. immediate callbacks are always dialled).
Setting Callbacks
Callbacks can be configured if Web AdVisor has logged onto a rostrvm Outbound dialling campaign. Once a call is made it is either finished with or scheduled for a Callback. This information is then stored in the system so that the OutBound dialler can schedule the call.
To schedule a Callback
Selecting the Set Callback button displays the Callback dialogue window.
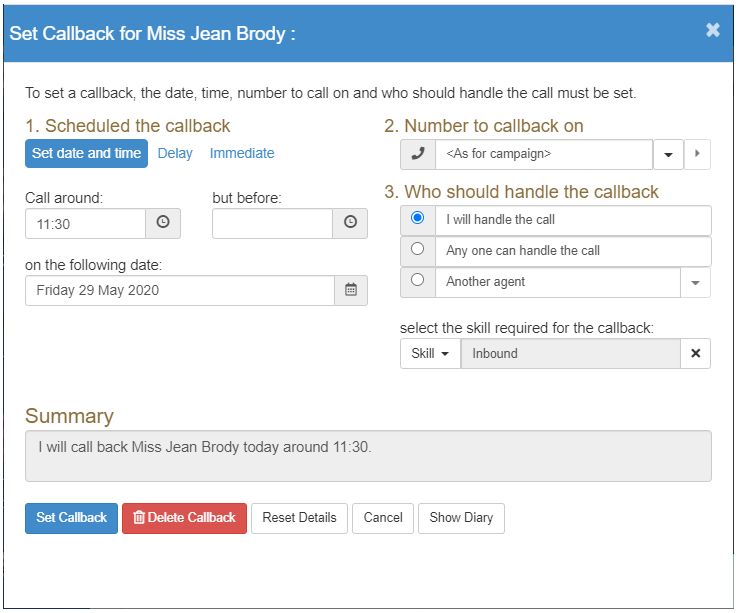
Choose a date and a time (earliest & optionally a latest time) or a delay (this can range from 5 minutes to 24 hours) or set an immediate callback.
Specify the number to be called, this can be: the current number; as defined within the campaign; one of the alternate telephone numbers; or you can enter a new telephone number.
Decide who should handle the call, this can either be yourself or any other agent (immediate callbacks are always done by yourself).
A summary note is written for you detailing the selections that you have made.
To record the details in the system select the Set Callback button. Check the details before continuing. If you do not want to keep the details select the Reset Details button to start again or Cancel to exit from the window without saving the details.
If the call time that you have set is outside the shift times set for the campaign then a warning dialog will be displayed, as shown below.
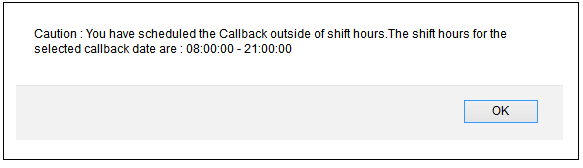
Click OK to close the dialog and re-select the Set callback button to change the callback time and set the new callback.
Checking a Callback
Before completing the current call, it is possible to revisit the callback dialogue and check the callback that has been set up for this customer.
To check a callback that has been previously set up during the call select the Set Callback button. Web AdVisor shows the callback details set up for the customer earlier in the call.
Deleting a Callback
When reviewing the callback details set up for a customer, it is possible to clear the details and delete the callback. Select the Set Callback button. Web AdVisor shows the callback details set up for the customer earlier in the call.
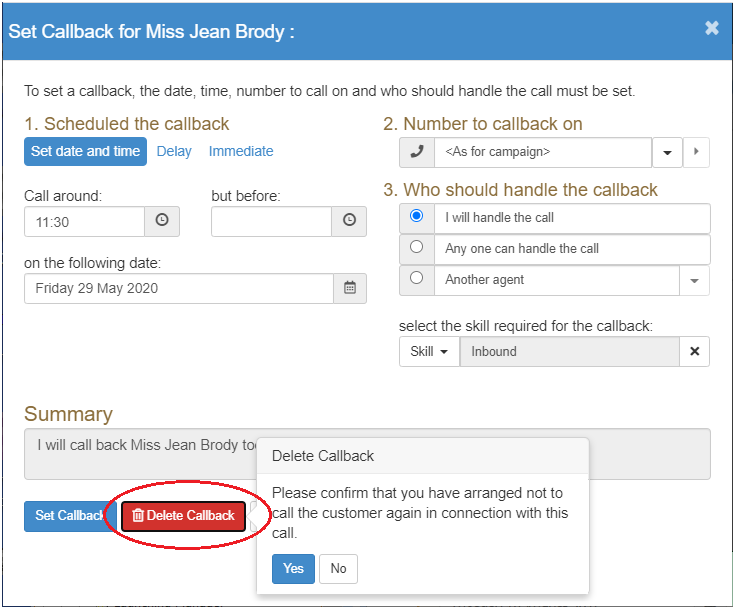
Select the Delete Callback button to clear the callback. Click the Yes button on the confirmation dialog to confirm the delete.
Note that it is not possible to delete an immediate callback.
Handling Notes
It is possible to include notes against an account that is being scheduled for a callback, and to view and add further notes to the account when handling the callback. To configure the system to do this:
| • | Add a notes field of type Text to the data store associated with the list and campaign and set the OutBound Synchronization field to Callback Notes; |
| • | From the Campaign Properties OutBound tab, tick Enable Callback Notes. |
When handling an account and scheduling a callback an additional Notes field is displayed on the Set Callback dialog.
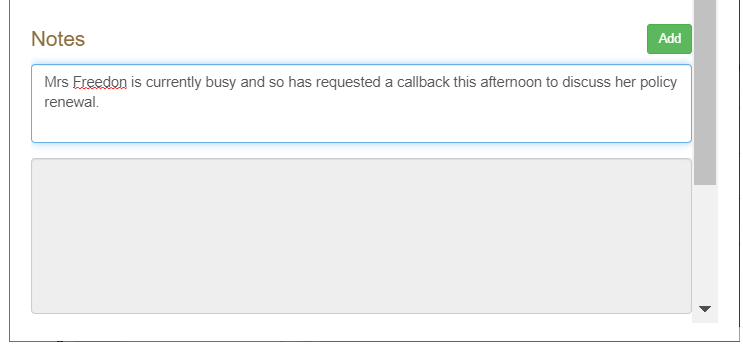
To add notes to the callback account simply type into the Notes field and click the Add button. The details will be displayed in the history pane (greyed out) with the date, time and user that added the notes.
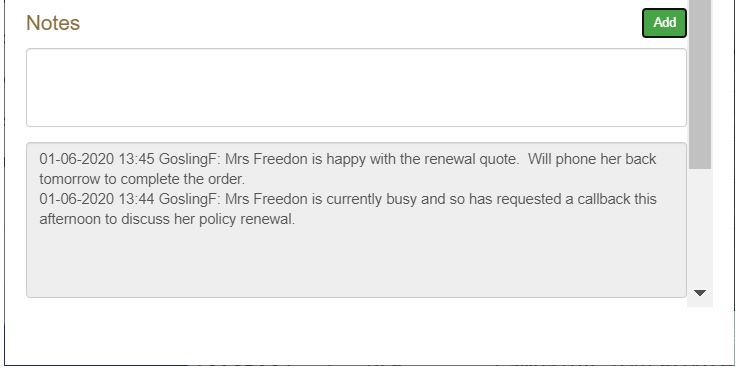
When the callback is made, any previous notes are displayed in the history pane. Additional notes can be added and these will be inserted at the top of the history pane.
You can view all callbacks that you have set for yourself by looking at the Callback Diary. By default the Diary will be opened with today's date highlighted on a week's display.

You may alter the view by clicking the right or left chevron, today, month, and week buttons at the top the Diary.
Setting a Callback from the Diary
To set a callback from the Callback Diary, you must select Show Diary from the Set Callback window (if you select the Diary from the toolbar button then you can only view callbacks and not set them).
Select the desired date and time for the callback from the calendar by clicking the desired cell and then clicking Yes.
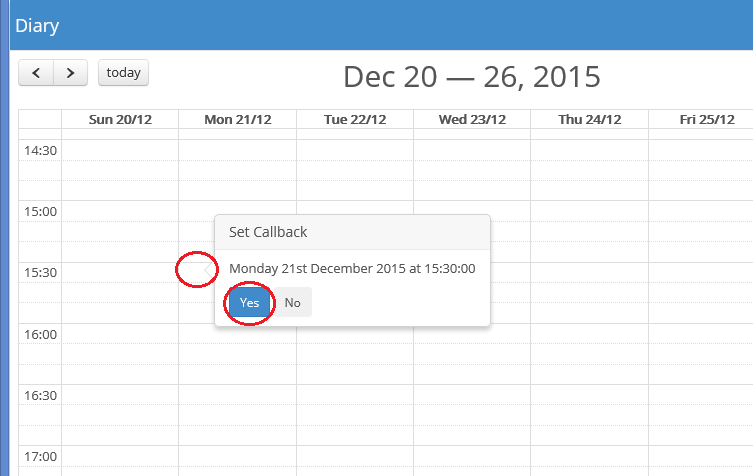
This will take you back to the original Set Callback dialogue window, with the time selected from the Diary set as the scheduled callback time. To record the details in the system select the Set Callback button as normal.
Terminating a Callback from the Diary
To terminate a callback from the Callback Diary, select the Diary from the toolbar button. Click on the callback entry which you wish to terminate and click the Terminate button from the options presented.
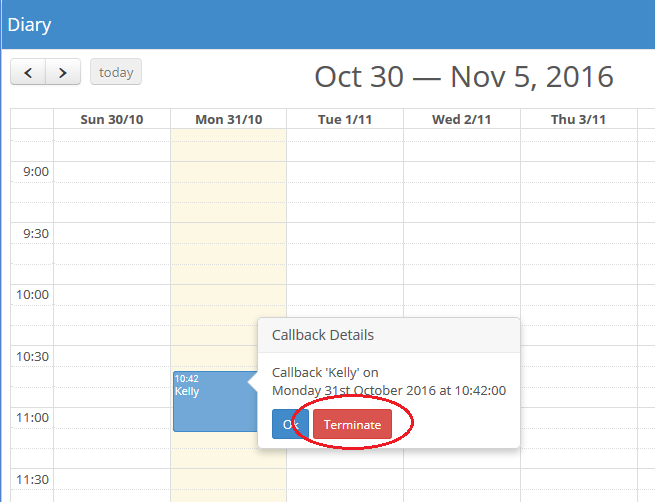
From the confirmation dialog click Yes to confirm that you wish to terminate this account. The account is terminated and the callback entry is removed from the Diary.