rostrvm Manager provides a real-time and historical view of your operational information. This view is provided within a browser window and so can be accessed from any browser enabled device provided there is network access to the rostrvm server (see Manager access and logon for details).
From most Manager displays and reports you can drill down to obtain more information on the current and historic operational status. This is either achieved by clicking on any of the blue fields from your current display, or directly from the drop-down menus from the title bar. Each display consists of one or more panels, each panel showing related information. Various fields within each panel have links to other displays that provide more details about the selected item.
Between the title bar and main display are the report parameters. These vary depending upon the display, some pages only have 1 or 2 parameters whereas others contain many more. These report parameters can be adjusted to filter the display content as required.
Clear Filters
The contents of each display can be altered using the report parameter fields just under the title bar. Which parameters are available depends upon the display. All have a Period parameter which is either fixed to Now and cannot be changed, or defaults to Today and can be changed. For displays with multiple parameters clicking the Clear Parameters button at the top right will reset them all to blank (except for the Period filter which remains set). An individual parameter can be cleared by clicking the clear button next to the parameter itself.
So for example if we look at the Agents On report with the State filter set to Ready:

and after clicking clear parameters ...

Run Report
The Run report button is only displayed if the Enable run button option is ticked on the report properties. This allows the setting of multiple parameters without waiting for the report to be executed after the setting of each one. The report is not executed until the button is clicked.
Many of the MIS reports can be changed to display different data depending on various input parameters (such as the date and time period). A list of the different parameters available are defined here.
Parameter (Type) |
Values |
Comments |
Date |
Date/time range: Period (user specified date/time range) |
Once set, will not change until set again. All displays will keep the same Date setting until it is set again. |
Call Class |
Configured Call Class Names |
|
Campaign |
Configured Campaign Names |
|
Type |
Type of the Call: Inbound |
|
Customer number |
Telephone Number |
All or partial match of Customer Number. |
Non-connected outcome |
True |
Indicates whether the display should only show calls with non-connected outcomes. |
Outcome |
Configured Business Outcome |
|
Queue |
Configured Queue Names |
|
User group |
Configured User Group Names |
|
User name |
Configured User Names |
|
Agent group |
Configured Agent Group Names |
|
Account ref |
An OutBound account reference |
|
Category |
Configured Categories |
|
State |
Ready |
|
Time in state |
|
Only show details of agents who have been in state for this length of time or above. A negative number displays agents who have been in this state for this length of time or less. |
Compare |
1 to 6 days |
|
Search |
|
Used by System Display only, to search for string in the Message field. |
Account status |
FilteredOut |
Account Status |
Termination code |
Max Calls to Busy |
Account Termination Code |
Some filter parameters also allow multiple selections to be applied to the search criteria. These are donated by a double arrow on the right-hand side of the parameter selection box:

Individual setting can be removed by clicking the x to the right of the selection.
Each display panel has its own title bar:

The following functions are provided:
| • | Title - the name of the panel; |
| • | Panel options - allows the panel to be renamed or deleted, and provides access to the SQL queries used to populate the data; |
| • | Refresh - provides options on how often the panel should be refreshed (note that reports are automatically refreshed after 30 minutes of inactivity); |
| • | Panel Style - options on how the data within the panel should be presented. |
Panels can be moved within a display by simply clicking and holding the title bar and then dragging the panel using the mouse.
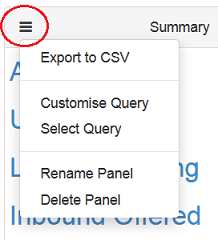
A number of functions are provided for each display panel. These can be selected from a drop-down menu by clicking on the panel options icon:

From here the user can:
| • | Export to CSV - export the display data to a CSV file (to be viewed or saved); |
| • | Customise query - allows access to the SQL query that is used to retrieve the data from the rostrvm database. This can be changed for custom reports to enable the required data to be extracted and subsequently displayed. |
| • | Select Query - gives access to a list of pre-defined SQL queries that can be used as a starting point when creating custom reports; |
| • | Rename Panel - renames the panel thus changing the name presented in the title bar; |
| • | Delete Panel - deletes the panel from the display. |
Other than export to CSV, these functions are provided primarily for manipulating custom reports and should not be used to change the rostrvm default displays.
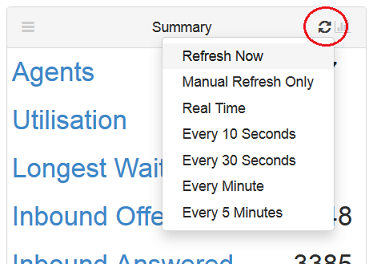
The refresh rate of each panel is configurable. To change this simply select one of the options from the drop-down menu available by clicking the Refresh button:

Care should be taken as changing the refresh rate to be too often can affect the performance of your rostrvm system. Complicated time-consuming queries should not be set to a small value.
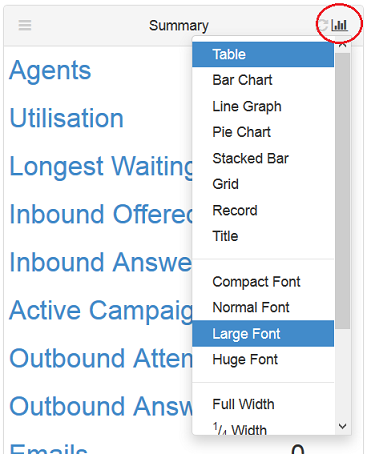
How the data retrieved is presented in a display panel can be changed through options on a drop-down menu accessed by selecting the Display Options button:

This allows the way in which the data is presented to be changed, and the size of the font and panel width to be set.
External Web Pages
Report panels can show external web pages by creating an iframe in the returned results from an SQL query.
For example:
select '<iframe src="https://www.rostrvm.com"
style="border: 0"
width="800"
height="600"
frameborder="0"
scrolling="no">
</iframe>' as ''