This section is applicable to rostrvm applications that are required to handle outbound calls to remote devices. It gives details of how to:
Remote device creation
The contact simulator can be used to receive outbound calls from a rostrvm device via an application. As for inbound calls, the remote device to be called can be a remote telephone number, or a non-rostrvm PBX extension. It is not necessary to create the remote device first. As long as the correct number plan is followed, the simulator will create the device automatically and if configured to do so will also pop the device to the screen.
The contact simulator can be configured so that it automatically pops remote devices when outbound calls are made to them, or it can be configured so that it does not. It can also be configured to automatically answer alerting calls at a remote device, or not.
To change the auto-pop option
To enable the auto-pop feature, ensure the View calls in window button is selected on the toolbar.

To disable the auto-pop feature, ensure the button is de-selected.
With auto-pop not set, outbound calls to the remote devices will not be seen on the main window. This mode is useful for load testing to maximize the performance.
To change the auto-answer option
To enable auto-answer, ensure the auto-answer button is selected on the toolbar.

To disable auto-answer, ensure the auto-answer button is de-selected.
With auto-answer set, the time taken to answer the call can be changed. This is achieved from the Times tab on the Settings display.
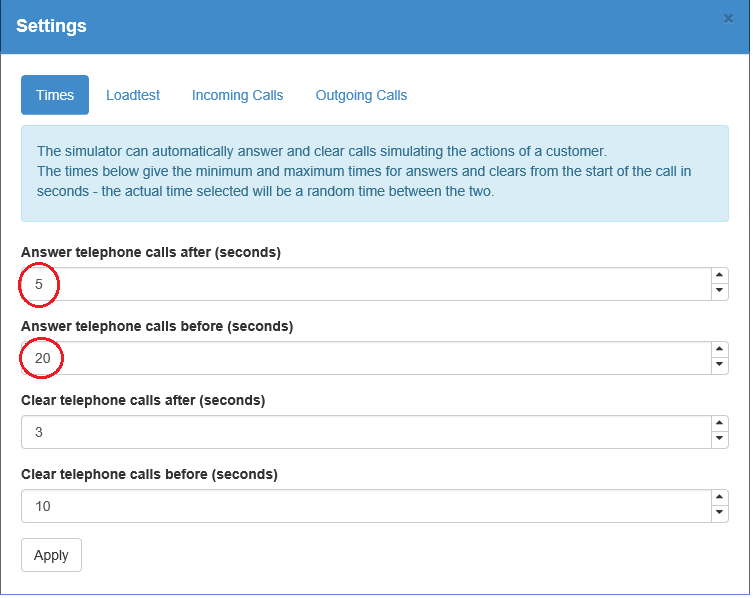
These values can be set or changed as required and applied by clicking the Apply button.
The following procedure assumes that auto-pop is set, and auto-answer is not. It also assumes the number of entries in the Remotes pane is less than 150 (as this is the display limit). This is the normal mode of operation when testing an outbound application prior to any load tests. This is so that calls to remote devices are displayed and can subsequently be answered.
To handle an outbound call
| 1. | From the application, make a call to a remote device using a valid destination. The contact simulator pops a new remote device with the number supplied. The icon shows the answer call icon with the device Id of the rostrvm static device making the call (in this case 6005).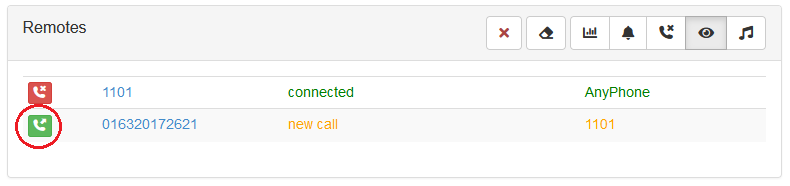 |
| 2. | Click on the alerting call icon to answer the call. The icon changes to the connected icon as the call is answered. |
Note: When making outbound calls numbers of some formats have special meanings as defined by the dial plan.
Once the call has been set up (i.e. connected), the outbound call can be manipulated in the same way as an inbound call. To hang-up simply click on the remote connected icon and click on the Hang up button.
If the remote device was automatically popped, then it will be removed from the display on hang-up, or when the call is cleared by the application.
To emulate an outbound call to an invalid destination or a busy number for example, the dial plan can be set or changed. This is done from the Incoming Calls tab on the Settings display.
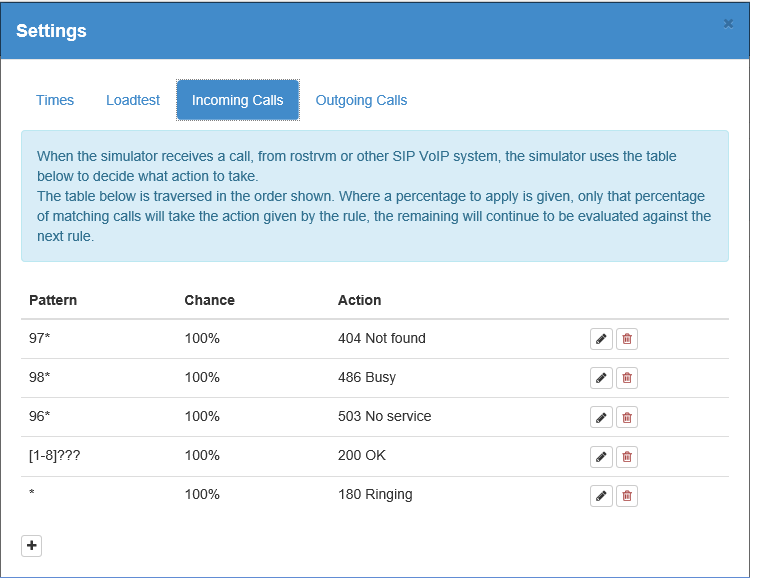
These settings show that any outbound calls from the rostrvm application (incoming to the gateway) to a telephone number beginning with 7, 97, or 96 will result in a failure. Any to a telephone number beginning with 8 or 98 will result in a busy. Numbers to any 4 digit device will be answered immediately (used for nail-ups), and all others will result in a normal alerting call. These can be adjusted as required by clicking the Edit Pattern button.
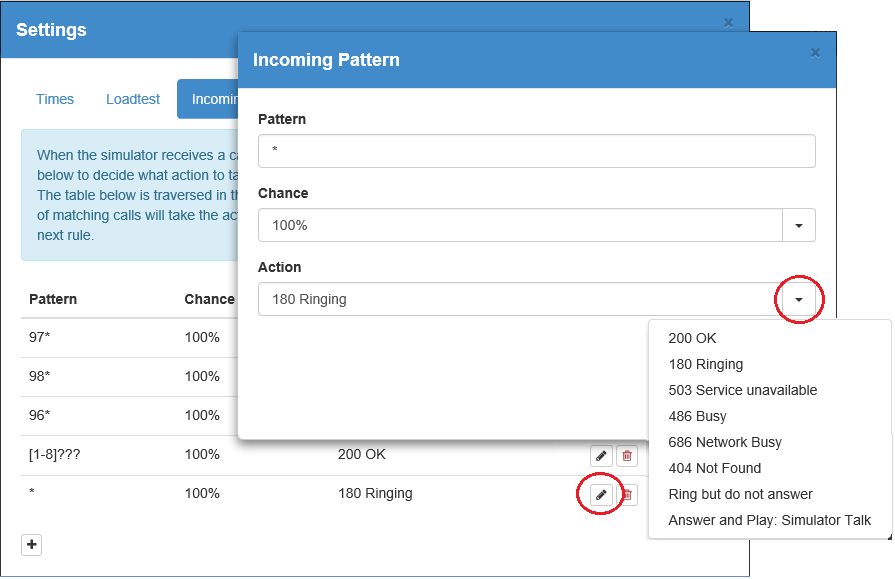
From here the Pattern, percentage of calls to be applied (Chance), and the Action can be changed or set.
Note: the Answer and Play: action references the name of the Invex Announcement files that should be played to the caller once the call has been answered (default is a file called Simulator Talk). If other files are added through the Invex Announcement utility under the Simulator folder then these will appear here also as available actions.