The CallGuide Script Editor is integrated into the rostrvm File Editor and enables CallGuide scripts to be constructed as a graphical flow diagram. The editor provides a simple interface where the user can build a script from prompt, response and action activities that are placed onto the design surface. The editor’s key features are:
• Simple drag and drop operation to build a CallGuide script;
• Set of pre-defined custom actions;
• A docking text editor with formatting facilities allowing prompt and response text to be easily entered;
• A spell checker with user dictionary;
• Simulation mode, allowing the navigation paths to be tested;
• Automatic layout in both vertical and horizontal directions;
• Automated tool to check that at least one Business Outcome has been set against each path through the script;
• Friction canvas with zoom, pan and drag operation;
• Find and replace functionality;
• Undo and redo facilities;
• Folding Prompt groups;
• Existing scripts can be opened in the designer;
• Full Print capability.
The following sections describe:
| • | how to start the editor and select a file for editing; |
| • | the functions provided by the design canvas; |
| • | the action activities provided by the editor; |
| • | how to manually connect prompt groups; |
| • | how links and anchors can be used to help the flow; |
| • | the functions provided by the Windows clipboard; |
| • | how existing manually built CallGuide scripts are handled; |
| • | how the screen layout can be altered; |
| • | how the text editing functions are used; |
| • | the information in the Property window; |
| • | printing your script; |
| • | navigating through the script in simulation mode; |
| • | spell checking the prompts in your script; |
| • | the standard find and replace functions; |
| • | how business outcomes are validated; |
| • | what workflow settings are available; |
| • | what property value helpers are available. |
To start the editor, from Manager select File Editor from the users menu. Note that if this is the first time the file editor has been run then it is downloaded from the rostrvm server - this may take a short time.
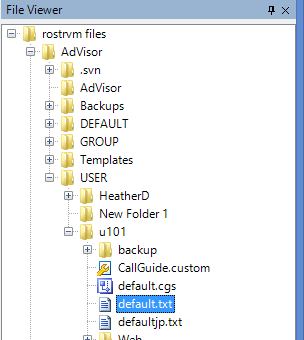
The CallGuide Script Editor may now be invoked from the File Editor by selecting a text file from the Advisor Profile CallGuide Filing System under GROUP or USER (not Templates - this should not be changed). Select a file to be edited and double click.
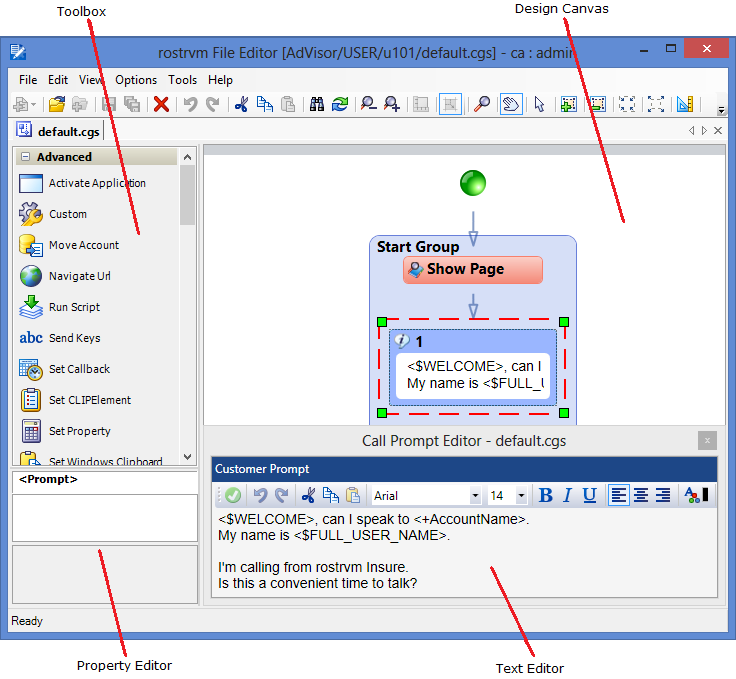
The file is opened in the Web Forms Editor forms editor in the left hand pane. The diagram below shows the rostrvm File Editor editing a CallGuide script document.
Adding a prompt group
The Design Canvas is the surface where the CallGuide script is constructed. A CallGuide script is built from a series of Prompt Groups that are linked together. A Prompt Group represents a CallGuide state that defines what the user should do next - for example what should be spoken to the customer or activity to be undertaken - and the expected responses.
A Prompt Group is added to the canvas by dragging it from the toolbox and dropping it onto the canvas. As a Prompt Group or Action Activity is dragged from the toolbox over an activity or connection on the canvas, it will highlight in red if a valid drop location has been reached.
Adding activities
Activities cannot be dragged from the toolbox and placed on the canvas in isolation. They must be connected to existing activity on the canvas. When an activity dragged from the toolbox is dropped at a valid location the editor will automatically create any required new connections.
Generally, activities dropped on connections will result in the activity being inserted between two existing activities. Activities dropped on other activities will result in the activity being appended to the existing activity. The editor will maintain the path if an activity is deleted from the middle of a path.
As new activities are added to the canvas, the canvas will automatically expand to accommodate the new activities. Any activity added to the canvas that falls outside the current view will result in the canvas being scrolled so that the activity is in view.
Canvas view and selection
The canvas can be zoomed up to double size using the Ctrl+mouse wheel or the toolbar zoom in/out buttons.
The canvas will either drag or a selection rectangle will be drawn when the mouse is moved while the left mouse button is selected. If the 'hand' tool is selected then the canvas will drag. If the 'arrow' tool is selected then a selection rectangle will be drawn.
Activities and connections are selected using standard Windows selection technique (mouse left button click while hovering over the item to be selected) or by drawing a selection rectangle. Activities are deleted from the canvas by selecting them and hitting the Delete key or selecting Delete from the Activities context menu. The editor will maintain the path if an activity is deleted from the middle of a path.
The Start Activity
The script's start point is represented by the Start Activity.
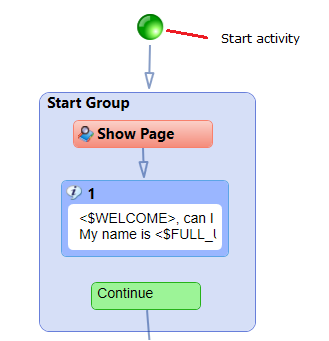
The CallGuide script editor only allows one Start Activity. An empty script will always contain a Start Activity. The Start Activity cannot be deleted.
Prompt Groups
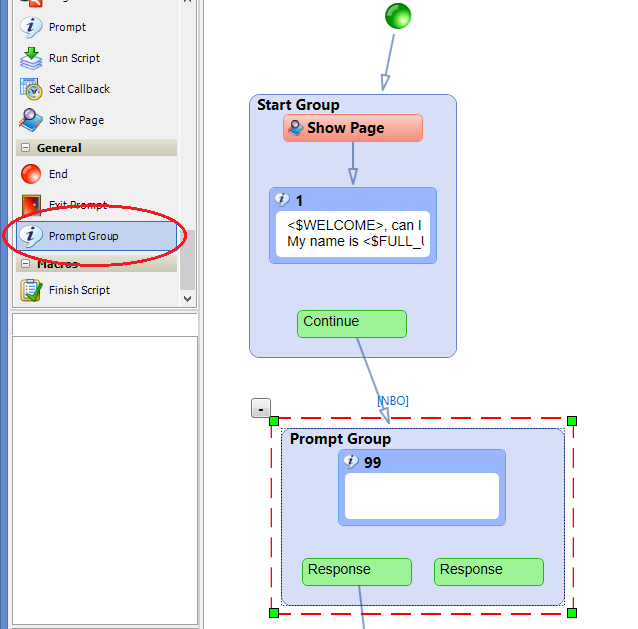
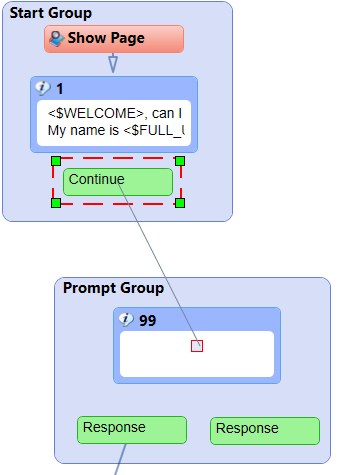
The first Prompt Group is added to a new script by dragging the Prompt Group Activity from the toolbox and dropping it onto the Start Activity. The Prompt Group will be created and placed on the canvas with a connection between the Start Activity and the Prompt Group. The first Prompt Group can also be added to a new script by selecting Add Prompt from the Start Activities context menu.
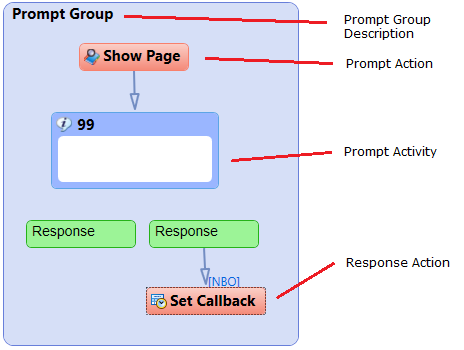
A Prompt Group may contain one or more Prompt Actions. A Prompt Action is an action that is shown on the canvas preceding the Prompt Activity and is executed by CallGuide at the point when CallGuide enters the prompt state.
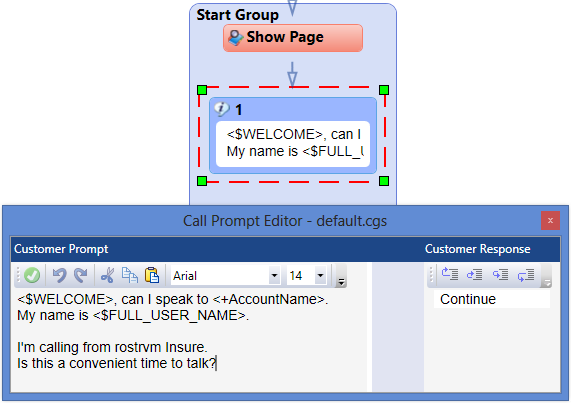
A Prompt Activity defines what is displayed by CallGuide and spoken to the customer by the agent when CallGuide enters a given script state.
A Response Activity defines a possible customer response and links the Prompt Group to the next Prompt Group if selected by the agent. A Response Action Activity defines an Action to be performed by CallGuide when the agent selects a given Response.
Each Prompt and Response Activity displays the text as it will appear when it’s displayed by CallGuide.
Each of the activities types is drawn in a different colour. Prompt Activities are drawn in blue, Response activities are drawn in green and Action activities are drawn in red. Prompt Groups are drawn with a light blue background.
Connections between a Prompt Activity and its Response Activities are not shown as the connections are implied by being contained in the same Prompt Group.
The CallGuide editor has a built-in set of rules that determine what Activities can be connected together. Any attempt to place an Activity at an invalid location will be rejected.
Each Prompt Group has a description associated with it. The default text when first dropped onto the canvas is ‘Prompt Group’. The text can be modified by clicking on the text to enter edit mode. Selecting the Return key or clicking outside the Prompt Group will apply the text change.
Manipulating Activities
Each Prompt Activity shows an Id at its top left corner. For a new script this number is auto generated by the editor each time a new Prompt Group is placed onto the canvas. The Id is used when the editor saves the document and generates the CallGuide .txt file. When a legacy script is imported, the Prompt Ids are maintained by the editor.
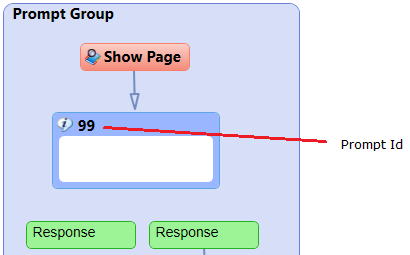
Clicking the right mouse button while a Prompt Activity is selected displays the Context menu for the Prompt Activity. Selecting Add Response from the Prompt activity context menu adds a new Response activity to the Prompt Group. A Prompt Activities Id can be changed by selecting Change Id from the Prompt Activities context menu or by clicking on the Id.
A Prompt Group must have at least one Response Activity. The last Response activity cannot be deleted from a Prompt Group. There is no upper limit on the number of Response Activities that can be created in a given Prompt Group.
Manipulating Actions
|
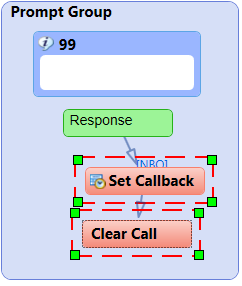
An Action (Set Callback in this case) dropped onto a Response will add the Action to the same Prompt Group as the Response. A connection will automatically be made between the Action and the Response it was dropped on. The dropped Action will become a Response Action and appear after the Response it was dropped on. An Action (Clear Call in this case) dropped onto a Response Action (Set Callback in this case) will add the Action to the same Prompt Group as the Response Action. A connection will automatically be made between the Action and the Response Action it was dropped on. The dropped Action will become a Response Action and appear after the Action it was dropped on. An Action (Set Callback in this case) dropped onto a connection which connects to a Response Action (Clear Call in this case) will insert the Action before the Response Action the connection connects to. The dropped Action will become a Response Action |
|
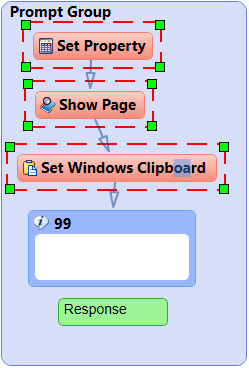
An Action (Set Windows Clipboard in this case) dropped onto a Prompt will add the Action to the same Prompt Group as the Prompt. A connection will automatically be made between the Action and the Prompt it was dropped on. The dropped Action will become a Prompt Action and appear before the Prompt it was dropped on. An Action (Show Page in this case) dropped onto a Prompt Action (Set Windows Clipboard in this case) will add the Action to the same Prompt Group as the Prompt Action. A connection will automatically be made between the Action and the Prompt Action it was dropped on. The dropped Action will become a Prompt Action and appear before the Prompt Action it was dropped on. An Action (Show Page in this case) dropped onto a connection which connects to a Prompt Action (between Set Property and Set Windows Clipboard in this case) will insert the Action between the activities the connection connects to. The dropped Action will become a Prompt Action. |
Any number of Prompt Actions and Response Actions can be added. The Actions are executed by CallGuide in the order they appear on the canvas.
Conditional branches
CallGuide supports conditional branching on a Response. This is shown by multiple branches originating from a given Response. A conditional branch is created by dropping an Activity (Action or Prompt Group - Set Property in this case) onto a Response that already has a branch (Show Page in this case).
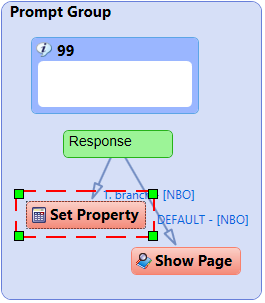
A Response with one or more conditional branches will show the conditional branch priority (1 being the highest), a description of the conditional branch and the assigned Business Outcome. The condition and description for a Responses conditional branch are defined in the Property Window when the branch is selected.
The Response conditional branch with the high priority is evaluated first. If the result of the evaluation is TRUE then the branch is navigated. If the result of the evaluation is FALSE then the branch with the next highest priority is tested. Finally, if no conditional branch evaluates to TRUE the default branch is navigated.
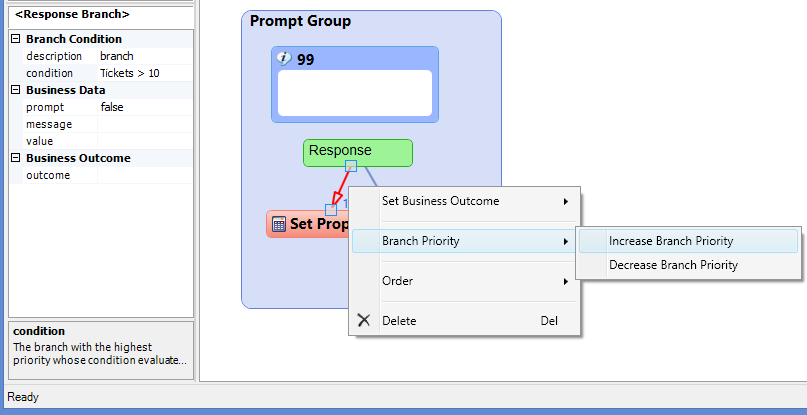
The Priority of the conditional branch can be increased or decreased from the branches context menu.
Response Branches
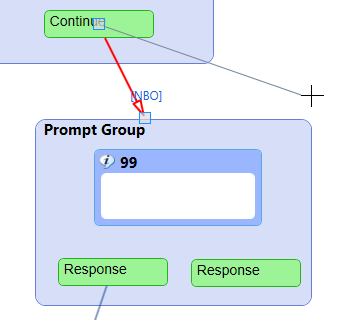
Each Response branch can have a single Business Outcome assigned to it. This will be automatically recorded in the rostrvm MIS if the branch is navigated. If a Response branch has no Business Outcome assigned then it will have a No Business Outcome (NBO) value.
The Business Outcome assigned to a Response branch is set from the Property window when the branch is selected or from the branch's context menu.
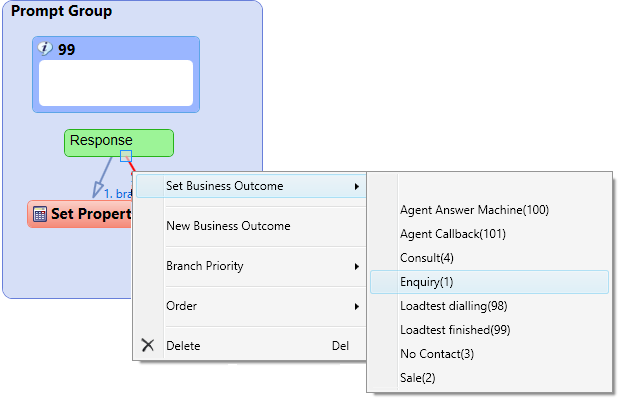
The Business Outcome assigned to a given Response activity branch is displayed alongside the branch connection.
A new Business Outcome can be created by selecting the New Business Outcome option from the branch context menu. On doing so the New Business Outcome dialog is displayed.
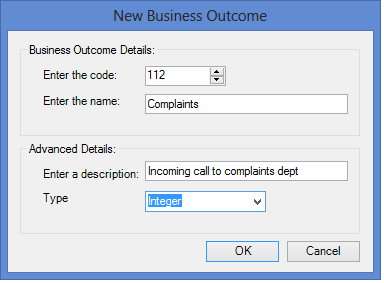
This allows the Business Outcome code, name, description and type to be selected. Selecting OK will create the new business outcome code. If the code already exists an error is displayed and the user is allowed to select another code.
The toolbox contains a number of CallGuide workflow activities that form the building blocks of a CallGuide script that can be dragged from the toolbox and dropped onto the canvas. It is split into a number of different categories. All the activities in the toolbox are action activities with the exception of the End, Exit Prompt and Prompt Group. These action activities specify an action to perform by CallGuide when the path containing the action is navigated.
An Action Activity may have one or more configurable properties. These properties are displayed in the editor's Property Window when an Action Activity is selected on the canvas. A list of activities, together with their properties, is described here.
Advanced
Activate Application
Activates a running Windows application. Activating an application will bring the application to the top of the Windows z-order and give it keyboard focus.
Properties: appname - The name of the application to activate (the name of the application from the application's caption bar).
Custom
Allows raw VBScript to run. Normally, the entered raw VBScript will call an existing Subroutine or Function in the CallGuide custom file.
Properties: action - The raw VBScript to run.
Move Account
Moves the current Outbound account to a specified new list.
Properties: destination list - To which list the current account will be moved.
Navigate URL
Launches a new instance of the IE browser and navigatse to the requested url. Any subsequent calls to NavigateUrl will re-use the previously created instance of IE. If IE is closed, a new instance will be automatically created on the next call to NavigateUrl.
Properties: url - The requested url in separate instance of IE. If this is the first time the action is used a new instance of IE is started.
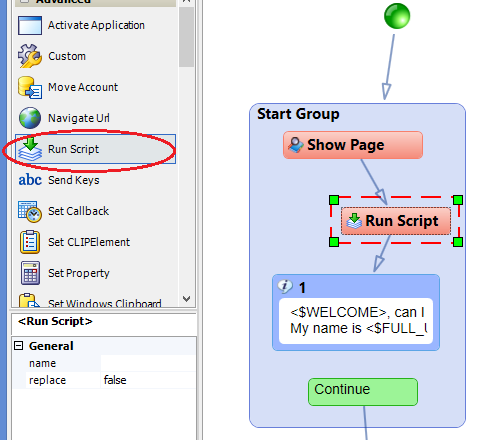
Run Script
Runs the specified CallGuide script. This allows a sub-script to be launched or the primary script to be replaced.
Properties: name - Name of the CallGuide script to run; replace - If true, all current scripts will be cleared.
Send Keys
Sends a series of key strokes to a given application.
Properties: appname - The name of the application to activate; keydelay - Specifies the millisecond delay between each key stroke; keystrokes - The key strokes to be sent.
Set Callback
Displays the Advisor’s Callback dialog.
Properties: None
Set CLIPElement
Sets a specified rostrvm CLIPboard element to the new desired value.
Properties: name - the name of the rostrvm CLIPboard element to set; value - the desired value of the rostrvm CLIPboard element.
Set Property
Sets a CallGuide script property to the desired value.
Properties: name - the name of the CallGuide property to set; value - the desired value of the CallGuide property.
Set Window Clipboard
Places the specified value on the Windows clipboard.
Properties: value - the value to be copied to the windows clipboard.
Show Page
Shows the referenced document in the specified CallGuide frame.
Properties: frame - the CallGuide frame in which to display the HTML document; document - the HTML document to show.
Start Call Recording
Starts rostrvm Call Recording.
Properties: None
Stop Call Recording
Stops rostrvm Call Recording.
Properties: None
Start Screen Recording
Starts rostrvm Screen Recording.
Properties: None
Stop Screen Recording
Stops rostrvm Screen Recording.
Properties: None
Agent Handling
Go NotReady
Sets the Advisor Not Ready at the end of the call.
Properties: Advisor to prompt for value - Specifies whether Advisor should prompt for the not ready reason; reason - the not ready reason in the case where the Advisor does not prompt for the value.
Go Ready
Sets the Advisor Ready at the end of the call.
Properties: None
Logoff
Performs an agent logoff.
Properties: Advisor to prompt for value - Specifies whether Advisor should prompt for the logoff reason; reason - the logoff reason in the case where the Advisor does not prompt for the value.
Call Handling
Consultation Call
Initiates a consultation call.
Properties: destination - the consultation destination; type - the consultation type; call class - the rostrvm consultation call class.
Drop Call
Drop the call and leave the agent in wrap-up.
Properties: None
Transfer Call
Transfer the call.
Properties: None
General
End
Specifies a CallGuide script end point. It is optional and normally only connected to a Response activity that has no onward path that requires a Business Outcome to be set. The reason for this is that a Response activity must have an onward path in order to set a Business Outcome.
Exit Prompt
A composite activity consisting of a standard CallGuide last prompt/response/action set. The standard CallGuide last prompt consists of a ‘Thank-you for calling’ prompt, a Next Call, Take-A-Break, Drop Call and Logoff responses with Go Ready, Go Not Ready, Drop Call and Logoff actions.
Prompt Group
A composite activity consisting of a Prompt and two connected Response activities. The Prompt activity text is blank and both Response activities have ‘Response’ as their text.
As the mouse is moved over an Activity on the canvas its connector will highlight if a manual connection can be made from the activity. A manual connection can be made by holding the left mouse button down while the mouse is over the highlighted connector. While the left mouse remains depressed, moving the mouse will draw a rubber band connection between the highlight connector and the new mouse position. As the mouse is moved over another Prompt Activity its connector will highlight showing that the connection can be made to it.
As the left mouse button is released while hovering over the Prompt connector a new connection will be made.
Selecting a connection will highlight the connection and make its source and sink connectors visible. A connection between two Prompt Groups can be modified. The source or sink end of the connection can be moved by dragging the connection end point and dropping it onto a different highlighted connector.
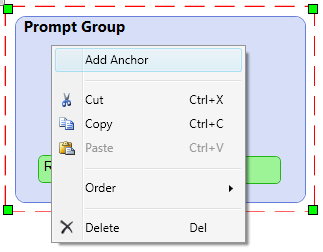
An Anchor defines an end point that is connected to a Prompt Group. They are used to cut down on the number of lines between prompts. It is set by selecting Add Anchor from the Prompt Groups context menu.
Each Anchor will have a numeric Id assigned to it which is displayed on the Anchor. The Anchor’s numeric Id may be modified by selecting the Id text and changing it to the required value.
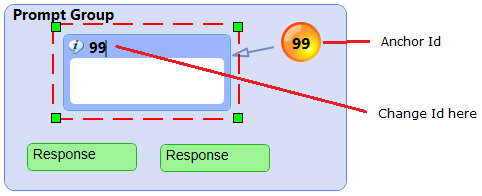
To apply the change, the Return key is selected. Clicking the left mouse button on the canvas will also apply the change.
If a manual connection is made between an activity and an Anchor, a Link is automatically created at the source end of the requested connection. The Link will show the Id of the Anchor it is connected to.
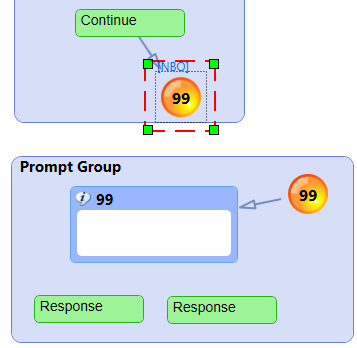
Only one Anchor can be created for each Prompt Group.
If an Anchor is deleted, any connected Links are also deleted. The connections to the Links will be redrawn connected to the Prompt Group that contained the deleted Anchor.
If the Id of a Prompt is changed, any connected Anchor and Links will be updated to reflect the Id change.
Selecting Jump to Anchor from the Links context menu will scroll the canvas to show the Anchor and associated Prompt Group.
The Anchor context menu has a Jump to Link tool. This tool has a sub menu showing a list of Prompt Groups names that are linked to the Anchor. Selecting a Prompt Group name from the list will scroll the canvas to the Link contained within the selected Prompt Group.
If a Link is double-clicked the editor will scroll the canvas to show the Anchor and associated Prompt Group.
Each Link Activity tool tip will display the Prompt Group it is connected to.
Deleting a Link will redraw the Link connection to the Prompt Group that contains the Anchor the Link was connected to.
The CallGuide editor provides Windows Clipboard facilities, allowing Prompt Groups contained on the canvas to be cut, copied and pasted.
Selecting an Activity and performing a cut or copy operation will also cut or copy the Activities Prompt Group and all other activities contained in the Prompt Group.
A copied Prompt Group pasted onto the same canvas will paste a copy of the Prompt Group with new Prompt Id and if present Anchor Id.
Prompt Groups copied to the Windows Clipboard can be pasted onto the canvas of other scripts.
The CallGuide Script editor maintains the original CallGuide .txt file format as used by AdVisor CallGuide. When a CallGuide script created in the editor is saved, a .cgs file is also created that defines the scripts layout details.
The CallGuide layout file has the same filename as the CallGuide script file but with a .cgs file extension instead of .txt. For a non rtmadmin FileEditor user, the CallGuide .cgs layout files are hidden from FileEditor's File Explorer.
When a CallGuide .txt file is opened in FileEditor, the CallGuide scripts layout file is searched for. If the layout file is found it is loaded into the designer. If a CallGuide script was not created using the CallGuide script editor it will not have a layout file. If a CallGuide scripts is opened that does not have a layout file, the editor will begin a script import process that generates a layout file from a CallGuide .txt file.
Renaming a CallGuide .txt file in FileEditor’s File Explorer will also rename the layout .cgs file. Deleting a CallGuide .txt file will delete any corresponding layout file. Moving or copying a CallGuide .txt file will also move or copy the layout file. Opening an empty CallGuide .txt file without a corresponding layout file will create a layout file containing a Start Activity. Changes made to a CallGuide .txt file outside the script editor will result in the .txt file being re-imported by the script editor when opened.
When a CallGuide script is opened in the CallGuide editor, the canvas will be automatically scrolled to the start script Prompt.
Configuration
The editor supports both manual and automatic layout. The layout settings are configured from the Property Window when the canvas has focus.
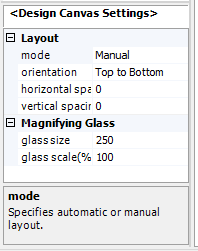
mode - Manual, Automatic; Sets whether positioning of the Activities on the canvas should be done automatically.
orientation - Top to Bottom, Left to Right; Specifies the automatic layout direction.
horizontal spacing - 0 to 500; Specifies the minimum distance (in 1/96th inches), between two adjacent nodes in the same rank.
vertical spacing - 0 to 500; Specifies the minimum vertical space (in 1/96th inches), between the bottoms of nodes in one rank and the tops of nodes in the next.
Manipulating Activities
Activities added to the canvas in manual layout mode are placed at the cursor position plus an offset. In manual layout mode Activities can be dragged around the canvas by holding the left mouse down on the selected Activity and moving the mouse cursor.
With the exception of the Start Activity all activities are contained within a Prompt Group. If a non-Start Activity is dragged outside the boundary of a Prompt group, the size of the Prompt group is automatically extended.
If a Prompt Group is dragged beyond the current canvas size, the canvas size is automatically increased. The canvas is also automatically scrolled so that the dragged Activity remains in view.
When an Activity is moved around the canvas in manual layout, all connections to the moved Activity are redrawn as straight lines.
Activities added to the canvas in automatic layout mode results in all the Activities positions and paths being recalculated. The connection paths in automatic layout are curved to avoid intersecting with Activities wherever possible.
Activities cannot be move manually when automatic layout mode is selected. If an Activity is resized in automatic layout mode, all Activity positions and paths are recalculated.
Prompt Groups
Prompt groups can be folded by selecting a Prompt Group and then selecting the minimise button located at the top left of the Prompt Group.
Folding a Prompt group will hide all contained Activities and minimise the group. All connections will still be shown, but shown entering and leaving the group, as opposed to entering and leaving Activities in the group.
A Prompt group can be expanded by hitting the maximise button on a selected folded Prompt Group.
Canvas Glide
The canvas implements a friction glide where the canvas if dragged with the mouse and then released will continue to glide until friction slows it to a halt. A gliding canvas can be stopped by selecting the canvas with the left mouse button.
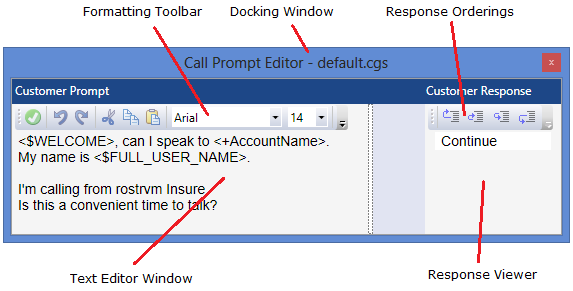
The text editor allows the user to create and edit both Prompt and Response CallGuide text.
Configuration
The text editor window can be configured in a number of ways:
| • | Docked window above the canvas; |
| • | Docked windows below the canvas; |
| • | Floating window; |
| • | Auto-hide window. |
The text editor window must be pinned before its docked position can be modified.
The text editor docking position is changed by dragging the mouse while the text editor caption bar is selected. During dragging, the available docking position will become visible. When the mouse cursor is moved to a new docking position and the left mouse button released, the window will automatically dock at the new window position. If the mouse left button is release while not at a docking position the window will become a floating window.
The text editor window when docked can be unpinned. When the text editor window is unpinned it will auto hide when it losses keyboard focus. Selecting the pin will toggle between pinned / unpinned
The sizing bar allows adjustment of the relative sizes of the text editor and response ordering windows.
Populating the Text Editor Window
Selecting a Prompt Activity on the canvas will display its prompt text in the text editor. The Prompt responses will be displayed in the Response window.
Toolbar functions
|
Apply changes made to the Activities text. Once selected the text displayed by the Activity on the canvas is updated to reflect the changes. |
|
Undo the changes made to the text in the text editor. |
|
Redo the changes made to the text in the text editor. |
|
Cut the currently selected text and place it onto the Windows Clipboard. |
|
Copy the currently selected text to the Windows Clipboard. |
|
Paste text from the Windows Clipboard into the text editor at the current cursor position. |
|
Sets the font family for the currently selected text. |
|
Sets the font size for the currently selected text. |
|
Makes the currently selected text Bold. |
|
Makes the currently selected text Italic. |
|
Underlines the currently selected text Bold. |
|
Left justify the currently selected text. |
|
Centre justify the currently selected text |
|
Right justify the currently selected text |
|
Displays the colour selection dialog allowing the text colour for the selected text to be chosen. |
|
Displays the colour selection dialog allowing the highlight colour for the selected text background to be chosen. |
|
Displays the CallGuide parameter selection popup, allowing a CallGuide parameter macro to be inserted into the text. |
|
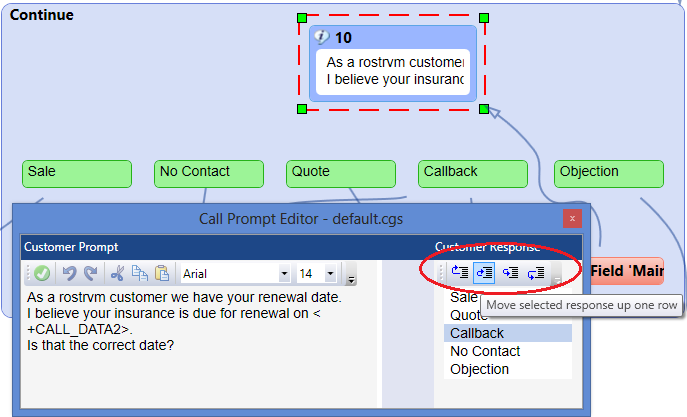
Move the selected Response Activity display position to the top of the list. |
|
Move the selected Response Activity display position up one position. |
|
Move the selected Response Activity display position down one position. |
|
Move the selected Response Activity display position to the bottom of the list. |
Using the Response Window
Each of the responses for a given Prompt is displayed in the order they were created. The display order can be modified by selecting a response and then using the re-order buttons to move its position accordingly.
When an activity or branch connection is selected, its properties are displayed in the property window. If the selected item does not have any properties the property window will be blank.
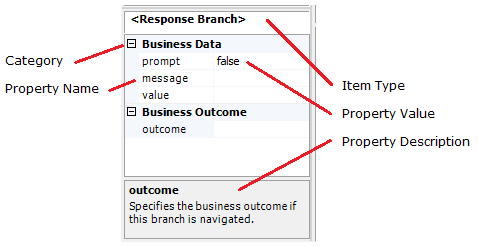
Selecting a property value will allow the value to be modified. Depending the on the type of property new values may be entered directly, selected from a drop-down or popup dialog.
If an invalid property value is entered an error is displayed and the previous value is restored.
When a property is selected, a brief description about the property is displayed in the bottom pane of the property windows.
The CallGuide script editor provides a print facility which is invoked by selecting Print from the File Editor's File menu:
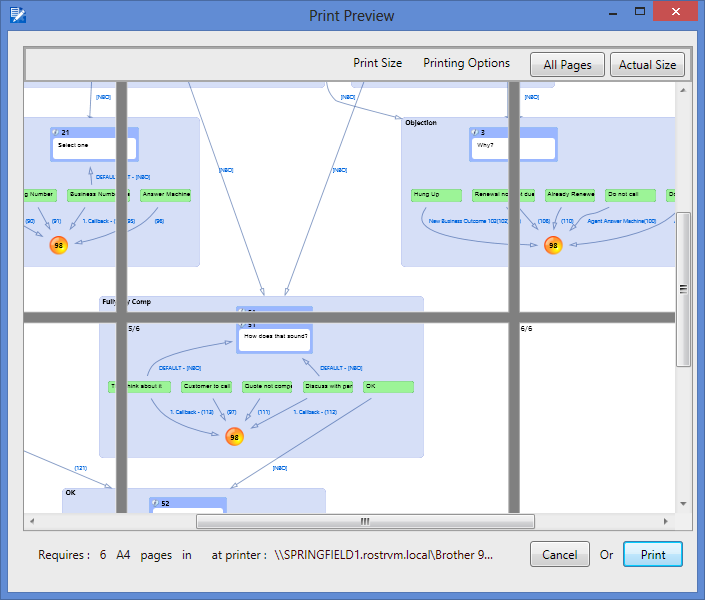
The Print Preview window is displayed. A CallGuide script is shown on the print canvas split across one or more pages. The window shows how the CallGuide script will be appear on each printed page.
Details of the current page size, orientation and name of the printer are shown at the bottom left of the print module window.
If All Pages option is selected the print view magnification is adjusted to see all printed pages.
If Actual Size option is selected the print view magnification will match that of the design canvas.
Selecting the Print button will send the document to the printer and hide the print preview window. Selecting the Cancel button will hide the print preview window without printing.
Scaling
The print preview window allows the CallGuide script layout to be scaled. This allows more of the layout to be printed on fewer pages. The script layout is scaled by adjusting the slider on the Print Size dialog.
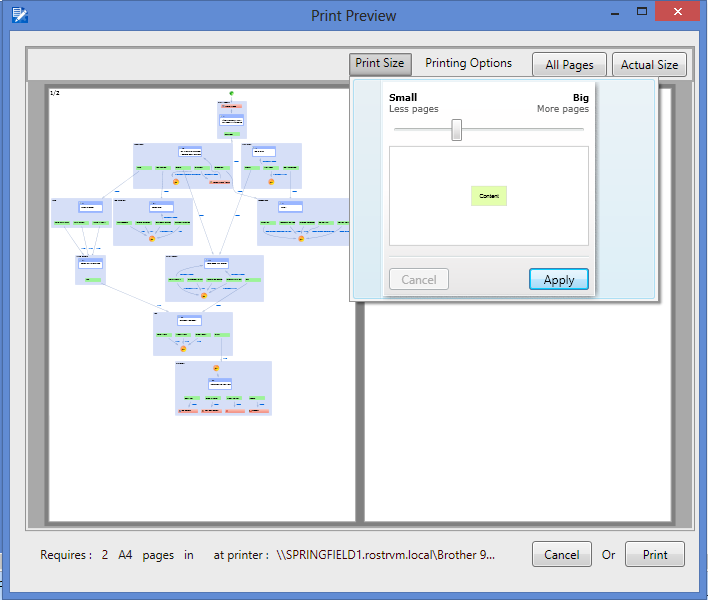
When the new size is applied the print canvas will update accordingly.
Printer Properties
The Print Preview window allows the printer properties to be changed. The properties that can be changed include, paper size, orientation, printer and number of copies.
The Mark Page Position if selected includes a page position label to the top left of each printed page. The label format is <current page>/<total pages>.
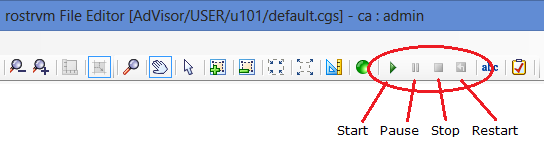
The Call Guide script editor implements a simulation mode that allows a script to be navigated as it would be in Advisor CallGuide. It can be started, paused, stopped, and restarted using the simulation button on the toolbar.
Selecting start simulation with no Activity selected will scroll the first Prompt into view. The first Prompt will become the start point for the simulation.
Selecting start simulation when an Activity or connection is selected will select the Prompt that is in the same group as the current selection. This Prompt will become the start point for the simulation.
When the mouse is hovered over a Response in simulation mode the response text will highlight in red. The response path to the next prompt group will also highlight.
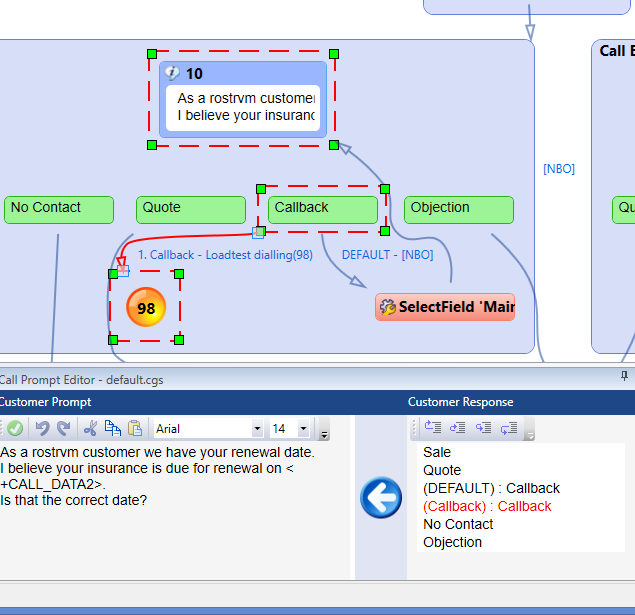
Selecting a response from the Customer Response window in simulation mode moves the selected prompt onto the prompt that connects the highlighted path. If there is no onward connected prompt, the selection stays with the current prompt.
As each prompt is navigated in simulation mode a history of previously selected prompts is captured. Selecting the Back button will navigate to the previous selected Prompt and remove that selection from the history.
As each prompt is navigated in simulation mode the canvas is automatically scrolled so that the selected prompt remains in view.
When navigating back the Back button will disappear once the simulation start point has been reached.
If during simulation mode an Activity or Connection other than the selected Prompt is selected, the simulation is paused. When a simulation is paused, the CallGuide script can be edited in the normal way.
Selecting Start will cause the simulation to continue and highlight the last Prompt before the simulation was paused. Selecting Stop will stop the current simulation, clearing the simulation history. Selecting Restart will restart the current simulation. The first prompt in the history buffer will be selected before the history is cleared.
During simulation the Prompt Response display order cannot be changed. To change the response display order, simulation mode must either be stopped or paused.
The Spell Checker is started from the toolbar or Tool menu. Starting the Spell Checker will display the Spell Checker dialog.
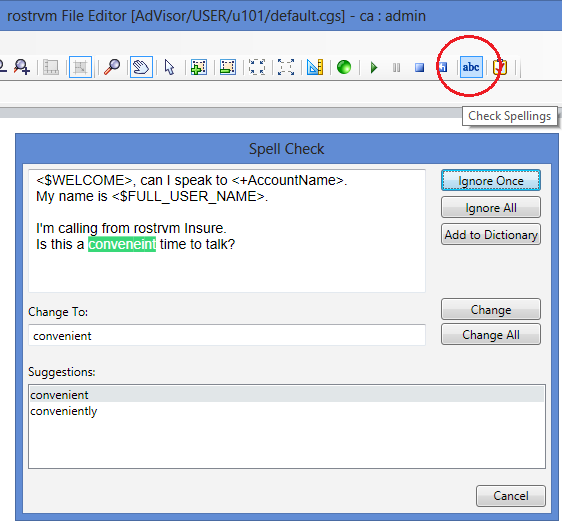
The Spell Checker will check all Prompt and Response activity text for spelling mistakes.
When a misspelt word is encountered the word will be highlighted in the Spell Check dialog and one or more corrective suggestions will be displayed. The user can respond to the misspelt word in the following way:
Ignore Once - Ignores the highlighted misspelt word, but will highlight other occurrences of the same misspelt word.
Ignore All - Ignores the highlighted misspelt word, but will ignore other occurrences of the same misspelt word.
Add to Dictionary - Adds the word to the user dictionary. This will indicate to the spell checker that this is a valid word.
Change - This will change the misspelt word with the selected suggestion.
Change All - This will change the highlighted misspelt word and all other occurrences of this misspelt word with the selected suggestion.
Cancel - Cancel the Spell Checker and closes the dialog. All spellings corrected by the spell checker up to point at which the Cancel is selected are not undone.
When the spell check encounters a misspelled word and a suitable suggestion is not available, the user can enter the corrective word in the Change To box.
The User Dictionary is a text file stored in the rostrvm Filing System. The userdictionary file is located in the folder FileEditor->Properties. The user dictionary format is the same as Microsoft Word (one word per line). Word user dictionaries can therefore be imported.
As each misspelt word is identified, the Prompt or Response activity containing the misspelt word will be selected and automatically scrolled into view.
Text changed by the Spell Checker is added to the undo buffer and can be undone if required.
Text can be searched or replaced in Prompt or Response activities using the standard FileEditor search and replace facilities.
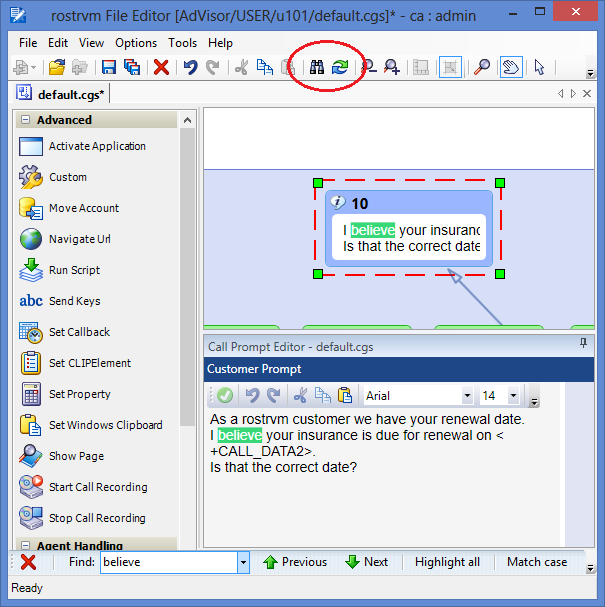
When a searched word is found the Prompt or Response activity containing the searched word is selected and scrolled into view.
Any words replaced during a replace operation are added to the undo buffer and can be undone if required.
One of the biggest issues when creating a CallGuide script is checking that every path through the script has a least one business outcome defined against it. This process can be time consuming and tedious when performed manually. This tool automates the checking process.
Business Outcome validation is started from the toolbar or Tools menu.

The results from a Business Outcome validation will contain :
| • | a single text header detailing the time the validation was started; |
| • | the number of paths without a business outcome defined; |
| • | an entry for each path without a Business Outcome defined. |
Each entry will contain a path description, the name of the document and a path reference.
Each path shown in the Results Viewer is represented by a series of connected Prompts and Responses, Activities are not shown. A Prompt is represented by its Id prefixed with the letter P, a connection is represented by ->, and a Response is represented by its display text.
Selecting a Business Outcome path in the Results Viewer window will highlight each node in the path on the display canvas. The last node in the path will be scrolled into view.
A warning message is displayed if an attempt is made to save a script containing one or more paths that do not have a Business Outcome defined.
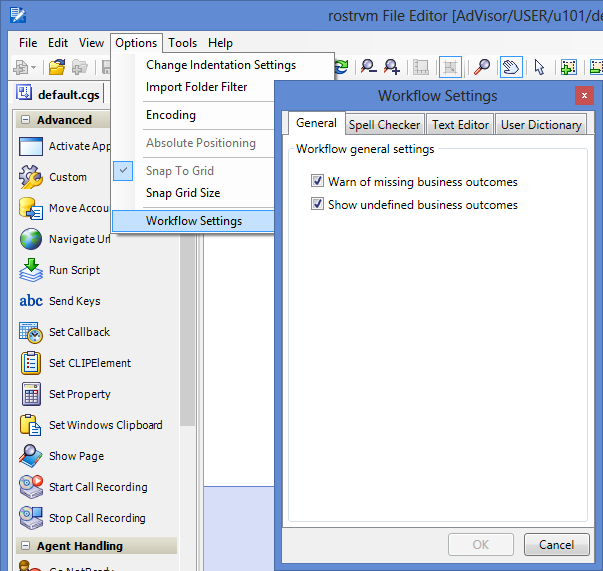
The Workflow settings are selected from the FileEditor Options menu and are divided into a number of categories each on a separate tab:
| • | General; |
| • | Spell Checker; |
| • | Text Editor; |
| • | User Dictionary. |
General
The General tab allows some business outcome parameters to be configured:
Spell checker Settings
The Spell Checker tab allows the workflow spell check to be modified.
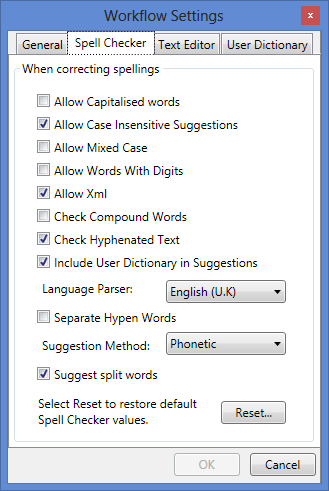
Allow Capitalised Words - If this property is checked the spell checker does not check words with all capital letters.
Allow Case Insensitivity Suggestions - If this property is checked the spell checker converts the entire word to lowercase before spell checking it. For example, The words HOuse, HoUse and HouSe will each have the same suggestions.
Allow Mixed Case - If this property is unchecked the spell checker treats words with mixed upper and lowercase letters as misspellings if they are not in the dictionary exactly as is. For example, The words HoUse, PeoPle and DoG will be spelling errors.
Allow Words With Digits - If this property is checked the spell checker does not check words that have numbers in them.
Allow Xml - If this property is checked the spell checker does not attempt to check spellings of XML and HTML tags. For example, <html>, <tr>, <br> will be ignored.
Check Compound Words - If this property is checked the spell checker will ignore words that should be separated by a space. For example, logoff and helloworld will be ignored. Setting this property to true will significantly decrease performance.
Check Hyphenated Text - If this property is checked the spell checker will look at each part of the hyphenated word to determine if there is a spelling error. Unchecking this property will force the spell checker to check for the entire hyphenated word in the dictionary. For example, if the property is unchecked the words right-click and spell-checker will be considered spelling errors.
Include User Dictionary in suggestions - If this property is checked the spell checker will use the user dictionary with the default dictionary when suggesting corrections for misspelt words.
Language Parser - The spell checker can use one of ten different language dictionaries. English (UK), English (US), English (Australia), English (Canada), Dutch, French, German, Italian, Portuguese, Spanish.
Separate Hyphen Words - If this property is unchecked the spell checker will treat words with hyphens as one word. For example the word Right-clck would consider the whole word to be error. If this property is checked then only the word clck would be considered an error.
Suggestion Method - Determines if the spell checker will find suggestions by hashing or phonetically.
Suggest Split Words - If this property is checked the spell checker can see that a combined word is two separate words, the split word will appear as a suggestion.
Selecting the Reset... button will restore the Spell Checker settings back to their default values.
Text Editor Settings
The Text Editor tab allows the text editors font and colour properties to be modified.
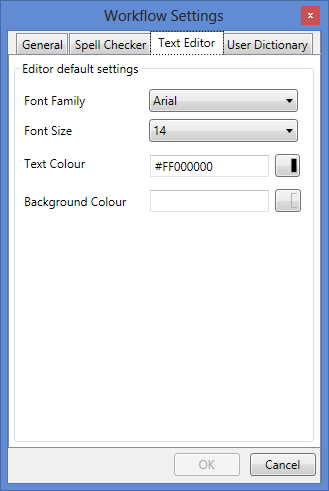
Font Family - This property sets the default font family for new workflow activities added to the canvas.
Font Size - This property sets the default font size for new workflow activities added to the canvas.
Text Colour - This property sets the default text colour for new workflow activities added to the canvas.
Background Colour - This property sets the default background colour for new workflow activities added to the canvas.
User Dictionary Settings
The User Dictionary tab allows the Spell Checker user dictionary to viewed and modified.
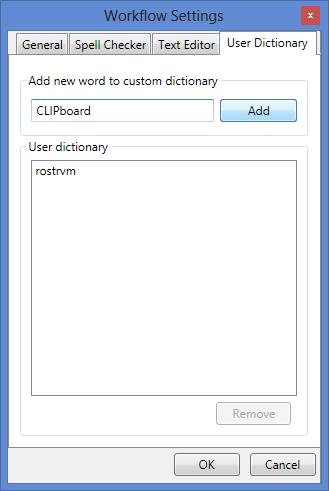
The current list of words in the user dictionary is displayed in the list view.
New words may be added to the user dictionary by entering the word in the new word text box and selecting the Add button. To apply the changes, the OK button must be selected. Selecting Cancel will undo the changes.
One or more word can be removed from the user dictionary by first selecting them from the list view and then hitting the Remove button. To apply the changes, the OK button must be selected. Selecting Cancel will undo the changes.
When a property value is selected in the Property Window, a Property Value Helper may be presented. A Property Value Helper presents a list of possible values the property may have, this will to aid in selection process.
CallGuide Parameter Helper
When a property value configured as a CallGuide Parameters type is selected, the CallGuide Parameter Helper dialog is displayed. A CallGuide Parameter can be a rostrvm CLIPboard element, a CallGuide script parameter or a numeric or string literal. An example of a CallGuide Parameter helper is the destination property for the Consultation Call activity:
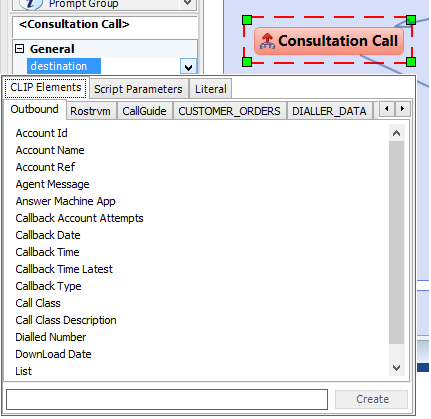
The CallGuide parameter helper dialog has 3 tabs.
CLIPboard Elements
The CLIPboard tab contains 2 or more sub tabs. The first two sub tabs, Outbound and Rostrvm contain predefined rostrvm CLIPboard elements. The other sub tabs relate to CLIPboard elements defined by CallGuide and rostrvm Data Stores. Each CLIPboard tab allows the selection of a rostrvm CLIPboard element value to be assigned as the property value. Selecting an element name from the list will hide the dialog and perform the assignment.
A new rostrvm CLIPboard element can be created and selected by entering the name of the new element and hitting the Create button. This will automatically register the CLIPboard element in the CallGuide.custom file.
The list of rostrvm CLIPboard elements includes the standard dialler fields and those bound to data stores.
Script Parameters
Allows the selection of a CallGuide script parameter value to be assigned as the property value. Selecting a parameter from the list will hide the dialog and perform the assignment.
A new CallGuide script parameter can be created and selected by entering the name of the new parameter and hitting the Create button. This will automatically register the parameter in the CallGuide.custom file.
The list of script parameters includes script variables, functions and subroutines in both the CallGuide.advscr and CallGuide.custom files that have been marked as browsable to the editor.
A CallGuide variable, function or subroutine is marked as browsable by adding '[Browsable(true)] to the previous line. For example, to make the script variable m_objectionOvercome visible, the code would look like:
'[Browsable(true)]
Private m_objectionOvercome
Literal
Allows a string or numeric literal value to be assigned as the property value. The literal is specified by first selecting its type using the radio buttons, then entering the value and finally selecting the Add button. Selecting the Add button will hide the dialog and perform the property assignment.
Script Action Helper
The Script Actions Helper dialog has a single tab. An example of a Script Action helper is the action property for the Custom activity:
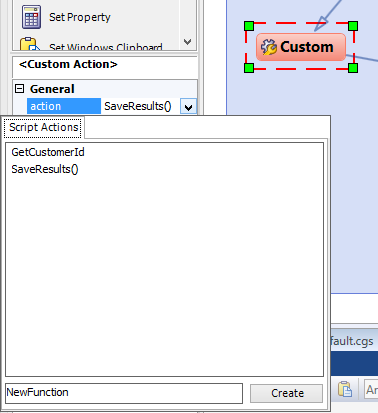
The tab contains a list of CallGuide functions returning values which have been marked as browsable in the CallGuide.advscr or CallGuide.custom files. Selection of a CallGuide action assigns the function result as the property value. Selecting an action from the list will hide the dialog and perform the assignment.
Outbound List Helper
The Outbound List Helper is a pop-up list of current outbound dialler lists. An example of an OutBound list helper is the Destination list property of the Move Account action.
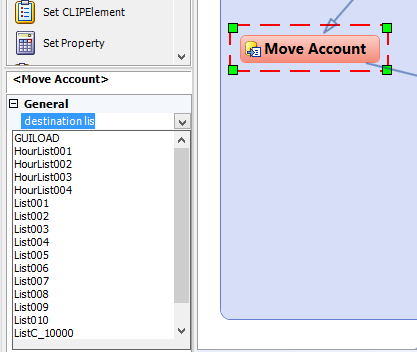
Selecting a dialler list name from the list will hide the dialog and perform the assignment.
CallGuide Script Helper
The CallGuide Script Helper displays a pop-up allowing the selection of a CallGuide script name and the initial prompt to run. An example of a CallGuide Script helper is the name property of the Run Script action.
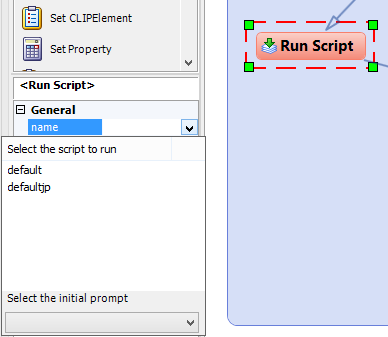
Selecting a CallGuide script name and initial prompt to run from the list will hide the dialog and assign the selection as the property value.
RtmClipElement Helper
The CLIPboard elements tab allows the selection of a rostrvm CLIPboard element value to be assigned as the property value. An example of a RtmClipElement helper is the name property of the Set CLIPElement action.
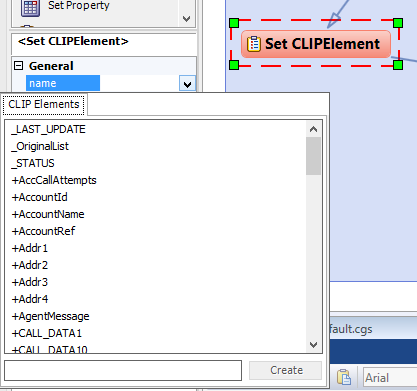
Selecting an element name from the list will hide the dialog and perform the assignment.
A new rostrvm CLIPboard element can be created and selected by entering the name of the new element and hitting the Create button. This will automatically register the CLIPboard element in the CallGuide.custom file.
The list of rostrvm CLIPboard elements includes the standard dialler fields and those bound to data store columns.
CallGuide Frame Helper
The CallGuide Frame Helper allows the selection of a currently configured CallGuide html frame to be assigned as the property value. An example of a CallGuide Frame helper is the Frame property of the Show Page action.
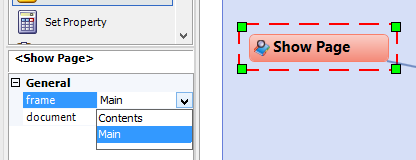
Selecting a frame name from the list will hide the dialog and perform the assignment.
User Status Helper
The User Status Helper allows the selection of a configured user status to be assigned as the property value. An example of a User Status helper is the reason property of the Go NotReady action.
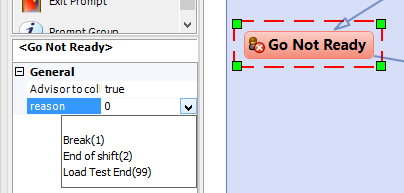
Selecting a user status from the list will hide the dialog and perform the assignment.
Consult Type Helper
The Consult Type Helper allows the selection of a telephony consultation type to be assigned as the property value. An example of a Consult Type helper is the type property of the Consultation Call action.
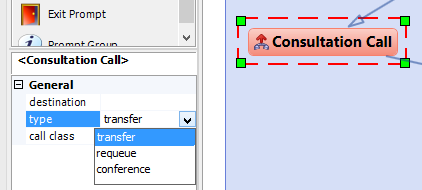
Selecting a telephony consultation type from the list will hide the dialog and perform the assignment.
Call Class Helper
The Call Class Helper allows the selection of a rostrvm call class to be assigned as the property value. An example of a Call Class helper is the call class property of the Consultation Call action.

Selecting a rostrvm call class from the list will hide the dialog and perform the assignment.
Business Outcome Helper
The Business Outcome Helper allows the selection of a rostrvm Business Outcome to be assigned as the property value. An example of a Business Outcome helper is the Business Outcome property of the selected branch.
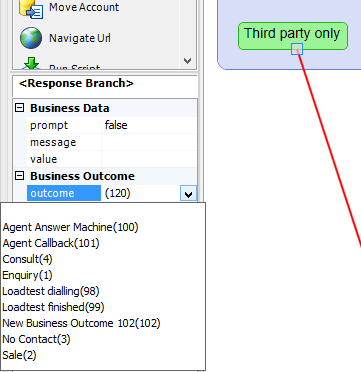
Selecting a rostrvm Business Outcome from the list will hide the dialog and perform the assignment.