The configuration information for rostrvm Keys is held centrally on the rostrvm server. There can be multiple sets of data stored each with its own unique name (default is KEYS). There is no practical limit to the number of configuration sets that can be held in the database, but the Keys configuration utility can only work with one named configuration set at a time, and the client only accesses one named set at a time. The name of the configuration is determined when the application is started.
The following sections describe what items need to be configured for rostrvm Keys. These include:
| • | the application details and associated call class; |
| • | the event(s) that will trigger actions; |
| • | the actions, keystrokes and data that are to be sent to the application; |
| • | how to apply any changes. |
To launch the rostrvm Keys configuration screen, right-click the Keys icon in the system tray and select Edit Scripts... from the drop down menu. The main screen is displayed:
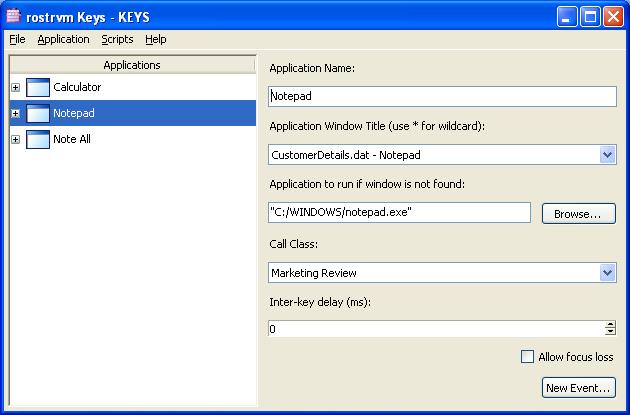
The banner shows which configuration set is being edited (in this case KEYS). The left hand pane lists all the Applications with the events that are configured for each one. The right hand pane shows the detail of one of these applications.
Application Name
Can be anything descriptive.
Application Window Title
This is how rostrvm keys identifies the application. Many applications change their name whilst running in which case the wildcard (*) enables it still to be found.
Application to run if window is not found
Can be any application with or without parameters, but the parameters are fixed. The command in this field will be executed if Keys cannot find any windows matching the Application Window Title. This field can be left blank to do nothing.
Call Class
This drop down list shows all the configured Call Classes in this rostrvm system. This defines the type of call.
Inter-key delay
Only specify this if a delay is wanted between every keystroke. If it is only wanted in specific places, for example while the application does a search, then it can be specified against the specific event.
Allow focus loss
Keystrokes sent by Keys are always received by the application that has focus. When an event happens, Keys will force the corresponding application into focus and then start sending the keys. With this check box unset, if the application window loses focus for whatever reason then Keys will abort sending keystrokes. When the check box is set, Keys will continue with the key sequence regardless. This is required when an application pops different windows as part of the intended sequence. For example the sequence: <ctrl-F> (pop the find window), send clipboard (containing the customer ref),<return> will result in a loss of focus when the <ctrl-F> is entered and therefore will require the check box to be set.
Selecting the New Event... button prompts for a new event and its associated parameter to be added to the currently selected Application. The Add event dialog is displayed:
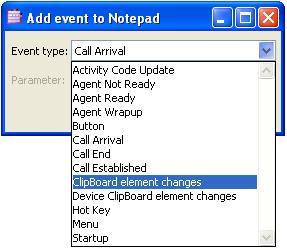
The meaning of each event is described below:
Event Type |
Parameter |
Description |
Activity Code Update |
Activity Code number |
This event signals that a rostrvm Activity Code data has been updated. This will typically be the agent using the rostrvm AdVisor to select an Activity Code, this can then trigger a completion action in the business application. Select the activity code from the list. |
Agent Not Ready |
|
An agent has become unavailable. |
Agent Ready |
|
An agent has become available to receive a call. |
Agent Wrap-up |
|
An agent has finished a call. Some switches only go into wrap-up after an Outbound call so this can be used to distinguish the call direction. |
Call Arrival. |
|
This event signals that a call has been delivered to the agent and is ringing on the agent's turret. Note, on the Spectrum switch the 'Call Arrived' event is not supported, as the Spectrum does not signal this condition. |
Call End. |
|
This event signals that the call between the agent and customer has ended. This can be used to trigger call completion actions. |
Call Established |
|
This event signals that a call has been connected between the agent and the customer. This can be used to pop a screen in response to a call. |
ClipBoard Element Change |
Clipboard element name |
This event signals that some information has been updated in the rostrvm ClipBoard. This can be used to pop a screen in response to call, or business, related data, and data from the rostrvm OutBound Dialler. Select the clipboard element name from the drop down list of the most likely names or type in the name of the clipboard. A name must be supplied (* is not valid). |
Device ClipBoard Element Change. |
Clipboard element name |
Same as the above except that it is associated with the previewing of OutBound calls. |
Non-rostrvm triggers |
|
|
HotKey |
Hotkey |
This trigger is made by the agent striking a local hotkey. Select the hotkey to be used from the selection given or type in the key name (e.g. F10). This is particularly useful when the agent needs control about when the application pop happens because, for example, they are doing background work in the application whilst awaiting an inbound call. The agent can then tidy up before allowing the keys to pop the rostrvm details. |
Menu |
Menu name |
This trigger is made by the agent selecting a menu option. Specify the menu option name in the parameter field. |
Startup |
|
This is triggered when rkeys starts an application, using the Application to run parameter, because it cannot find the window when searching for the window title. It can be used to get the application into an initial state (e.g. perform a logon). |
Note, the agent state change events are only triggered when they occur immediately after a call of the appropriate call class for the application.
Once an action is chosen it can be configured with the actions to be taken:
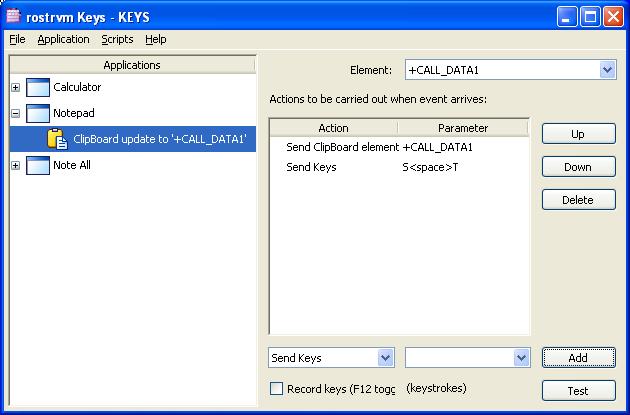
Right hand window
Shows the current sequence of actions.
Up, Down, Delete
These buttons change the ordering of the events. Click first on the event in the window and then apply the action.
Add
Select the required action type from the drop down list. Any parameters that are required can be set in the right hand drop down list, or can be typed in (e.g. to fill the parameter box for Send Keys use the Record Keys facility). Once completed use the Add button to put it into the list of actions.
Test
This will cause the actions to be taken as if the corresponding trigger had happened.
Action list
The actions taken as a result of a trigger can be one or more of the following:
Actions sent to rostrvm |
Parameter |
Description |
Answer Call |
|
Answers the call just arrived. |
Clear Call |
|
Clears any calls in progress at this device. |
Paste to CLIPboard |
element line column length |
Windows CLIPboard to rostrvm CLIPboard. |
Pause for seconds |
seconds |
|
Send Activity Value |
activity code no |
Blank if no value defined. |
Send Clipboard element |
name |
Puts the contents into application. |
Send Date/Time of format |
see below |
|
Send Keys |
sequence |
Type in sequence representation or use key capture. |
Send Script Result |
script name |
Invokes a previously written script from drop down list. |
Set Activity code |
element <space> data |
Set a fixed activity code. |
Set Agent |
Ready or Not Ready |
Can be used for a timed agent state change. |
Set Clipboard |
element <space> data |
Puts a fixed value in. |
Send Date/Time parameter elements
element |
Result |
%% |
Inserts % |
%a |
Abbreviated weekday name (Mon, Tue, etc.). |
%A |
Full weekday name (Monday, Tuesday, etc.). |
%b |
Abbreviated month name (Jan, Feb, etc.). |
%B |
Full month name. |
%c |
Locale specific date and time. |
%d |
Day of month (01 - 31). |
%H |
Hour in 24-hour format (00 - 23). |
%I |
Hour in 12-hour format (00 - 12). |
%j |
Day of year (001 - 366). |
%m |
Month number (01 - 12). |
%M |
Minute (00 - 59). |
%p |
AM/PM indicator. |
%S |
Seconds (00 - 59). |
%U |
Week of year (00 - 52), Sunday is the first day of the week |
%w |
Weekday number (Sunday = 0). |
%W |
Week of year (00 - 52), Monday is the first day of the week. |
%x |
Locale specific date format. |
%X |
Locale specific time format. |
%y |
Year without century (00 - 99). |
%Y |
Year with century (e.g. 1990) |
%Z |
Time zone name |
Record Keys
Having selected 'Send Keys' the key sequence can be typed into the keystrokes window indicating control and function keys using the constructs: <ctrl-s><F4> and so on.
An easier way is to click on the Record Keys check box or hit F12 and then any keys used on the keyboard will be recorded as the required sequence in the correct format until F12 is used again or the check box cleared using the mouse. If you need to include F12 in your key sequence then it will need to be edited afterwards into the sequence.
Scripting
In order to perform functions other than simply sending keystrokes to the application it is possible to run a TCL script. This requires the skills of a TCL programmer.
The functions that can be performed include screen scraping and cursor positioning using proprietary terminal emulation interfaces (e.g. Extra!) and conditional statements to allow intelligent navigation. The function should return one value which is then sent to the application when the script is called.
Once a configuration set has been created or changed it should be saved using the Save option from the File menu. The changes then need to be applied to the rostrvm Keys client by selecting Re-load from the File menu. This applies the changes to the local client only. For other clients to read in the changes the agents using rostrvm Keys should restart their rostrvm Keys client application.