In order for rostrvm to operate correctly on HTTPS it is necessary to install a valid SSL certificate on the rostrvm server (or servers) and for clients to refer to the rostrvm server using a global fully qualified domain name (e.g. server.rostrvm.com). Certificate authorities will not generate certificates for internal network machine names. This is likely to mean that local network name services must be configured to point the fully qualified name of the rostrvm server to an internal network address (or multiple addresses for a resilient service).
The basic procedure is as follows:
| • | Generate a CSR (Certificate Signing Request); |
| • | Obtain the signed certificate from a trusted source (e.g. Verisign, GoDaddy etc.); |
| • | Install the signed certificate; |
| • | Instruct the server to use the certificate for https requests. |
Installing a Certificate on a single server
These steps must be run on the server at which the certificate is targeted. All operations require Administrator privileges.
Generate CSR
Create an information file request.inf containing the details of the certificate required with the following content:
[NewRequest]
Subject = "CN=domain.name, ST=Surrey, L=Woking, O=Rostrvm Solutions Ltd, OU=rostrvm, C=GB"
MachineKeySet = true
HashAlgorithm = SHA256
KeyLength = 2048
RequestType = PKCS10
The domain.name above must be replaced with the fully qualified domain name for the machine; for example, server.rostrvm.com. Where the rostrvm server is likely to host multiple rostrvm domains a wildcard should be specified; for example, *.rostrvm.com. This name must be a global fully qualified internet name owned by the owner of the server – local names are not accepted for security certificates.
The other entries in the Subject = line must also be updated with the owning company information.
Run the following command in the directory containing the newly created file to create a new CSR:
certreq -new request.inf request.csr
The CSR will be stored on the server and a request.csr file will be created.
Request a Certificate
The request.csr file must be sent to the signing authority at this point.
Install Certificate
In due course the signing authority will return a signed certificate (named response.cer in this example) which can be installed using the following command:
certreq -accept response.cer
Register the Certificate
To use that certificate it must be registered for use with HTTPS. To do this it is first necessary to obtain the thumbprint of the certificate. The thumbprint may be found by double clicking the certificate response file within explorer (response.cer in our example).
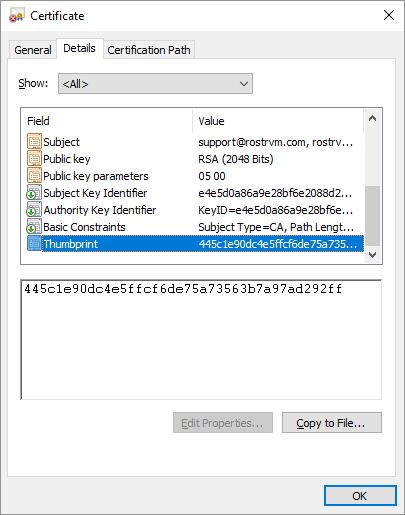
To register the certificate, use the following command:
netsh http add sslcert ipport=0.0.0.0:443 certhash=thumbprint "appid={ c87244f5-48c6-4158-1121-7dcdd4ad7660}"
In our example, thumbprint would be replaced by 445c1e90dc4e5ffcf6de75a73563b7a97ad292ff.
Check that the rostrvm server is using its HTTPS address and confirm the certificate is valid in the web browser (normally shown by clicking the padlock in at the top of the browser).
Installing on a Resilient Service
To install on a resilient service, follow the instructions for a single server, copy the CSR and private key from the server to the backup server.
This can be done by using the Manage Computer Certificates control panel application. Find the request under the Certificate Enrollment Requests folder and right click to select All Tasks… > Export. Export the private key with the certificate and leave all the options on their default settings – you will need to provide a password to protect the file.
Copy the exported PFX file to the backup server and double click the file in explorer – a Certificate Import Wizard should be shown to assist in importing the certificate. Import into the Local Machine with all other settings left as default.
Once this has been imported, follow the Install and Register instructions above on the backup server.